Kubernetes 理论与实践-2-存储-Volumes, ConfigMaps, Secrets, Namespaces
前文回顾

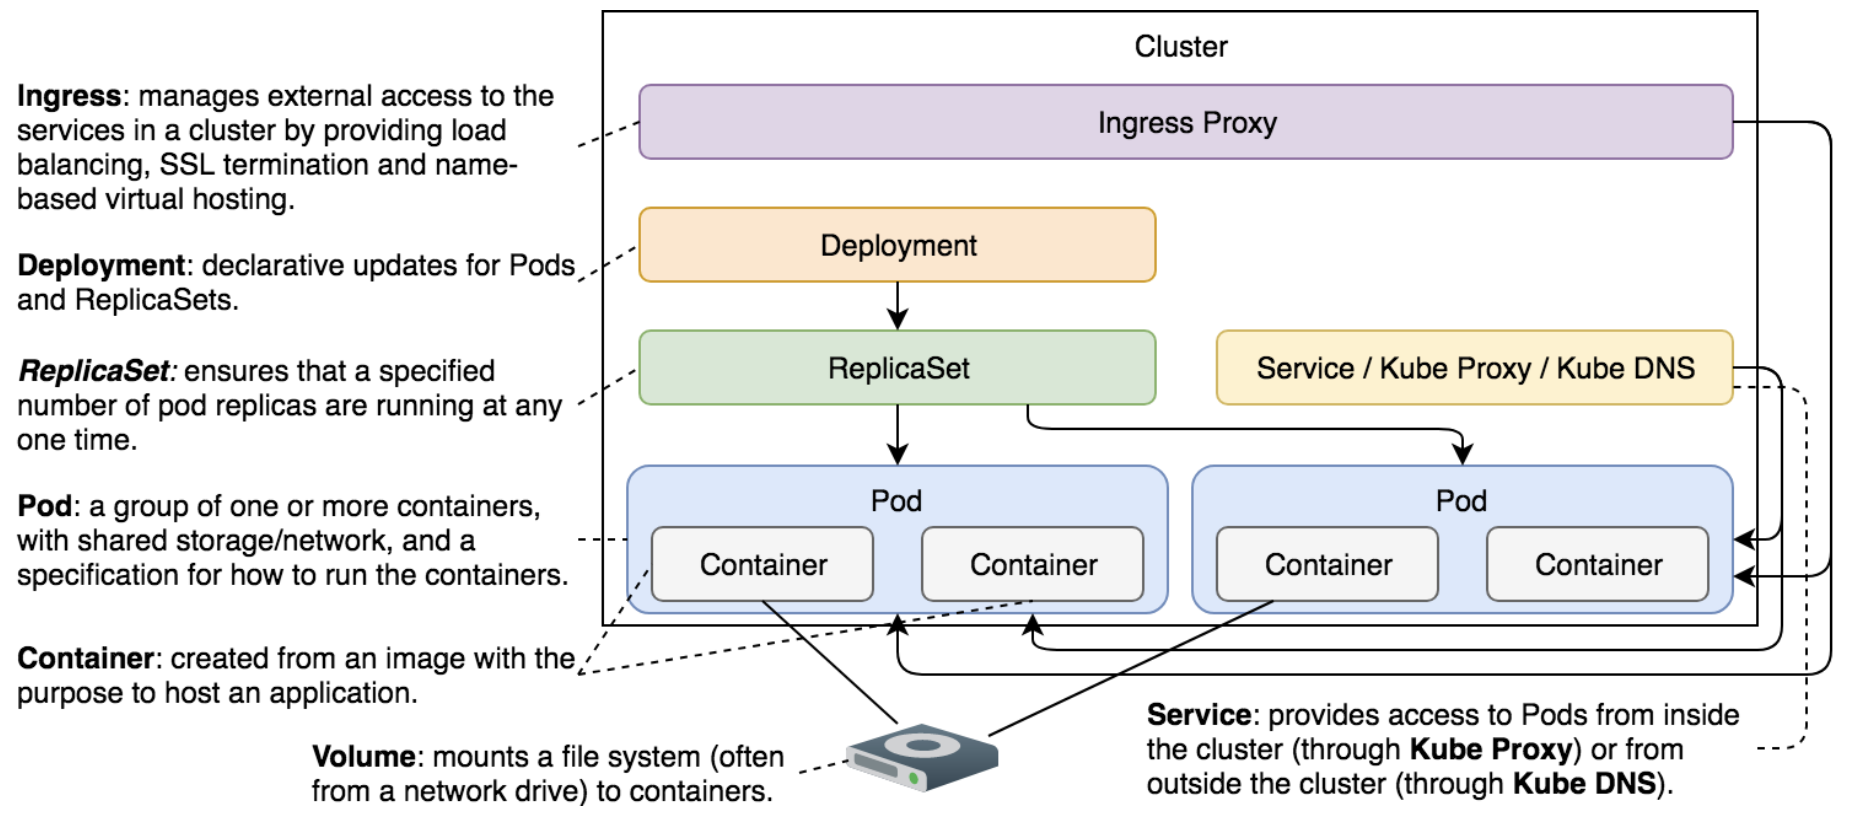
Kubernetes 理论与实践-1-基础-Pods, ReplicaSets, Services, Deployments
组件
Volume
我对"卷"作为存储空间的说法颇有不适,查了下发现这个和过去使用磁带来存数据有关,一盘"卷"磁带是一个存储空间,沿用到今天,硬盘里面,我们分完区也叫一个"卷"。
结构流程
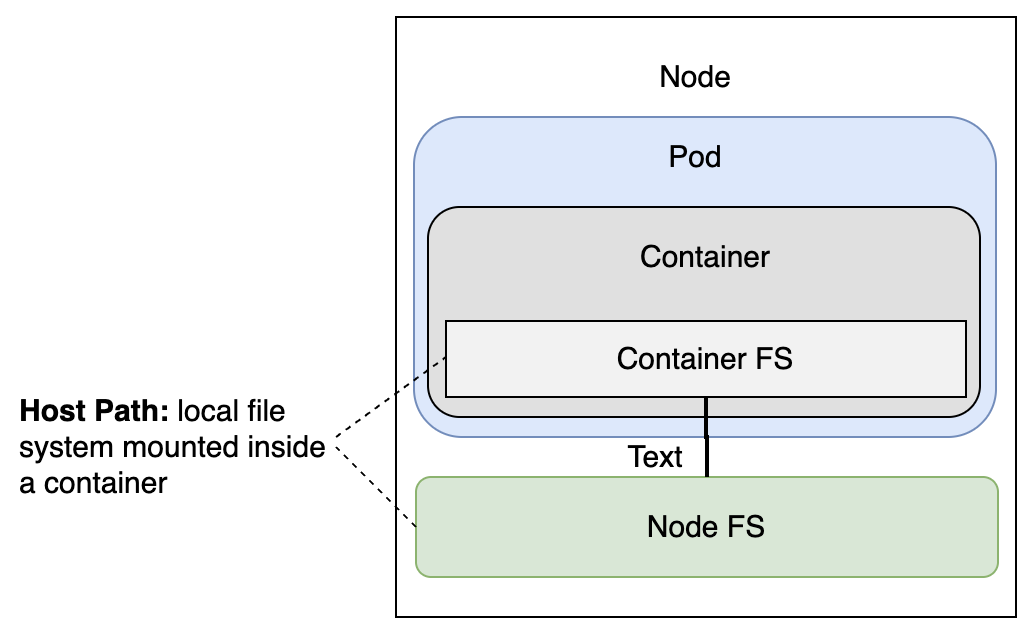
定义
这个设置并不是为了保存状态,而是让 Pod 通过 /var/run/docker.sock 能够访问运行在主机上的 Docker 服务器。
docker.yml
apiVersion: v1
kind: Pod
metadata:
  name: docker
spec:
  containers:
  - name: docker
    image: docker:17.11
    command: ["sleep"]
    args: ["100000"]
    volumeMounts:
    - mountPath: /var/run/docker.sock
      name: docker-socket
  volumes:
  - name: docker-socket
    hostPath:
	  path: /var/run/docker.sock
	  tpye: Socket
定义-挂载类型
volumes[0].hotsPath
volumes[0].hotsPath.type
- Directory
- DirectoryOrCreate
- File
- FileOrCreate
- Socket
- CharDevice
- BlockDevice
- ...
volumes[0].emptyDir
创建并保留卷,是具有持久性类型的卷。但不是最好的容错性卷,因为目前讨论中我们不具备网络驱动器(联网能力)。
volumes[0].gitRepo
将 gitRepo 作为 volume
volumes:
  - name: git-volume
    gitRepo:
      repository: "https://github.com/example/repo.git"
      revision: "main"
      directory: "." # 可选:指定克隆后的子目录
用于构建 CI/CD 的时候很有用。
volumes[0].configMap
请查看 ConfigMap 内容。
实践-创建挂载
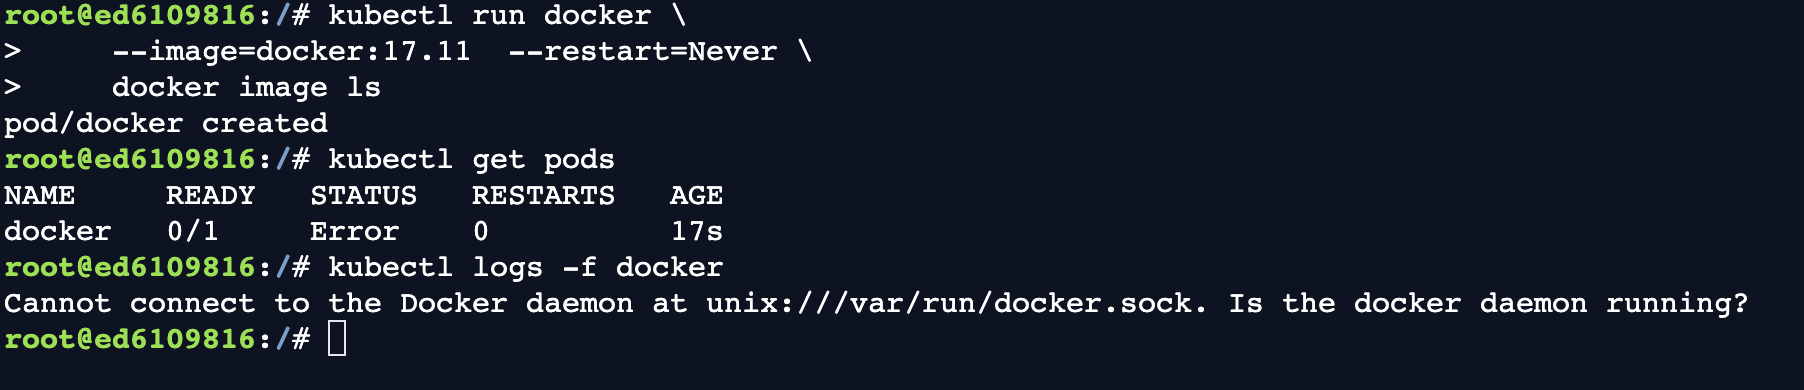
Run by command
# 这条指令有问题,因为没有挂载 /var/run/docker.sock
kubectl run docker \
    --image=docker:17.11  --restart=Never \
    docker image ls

kubectl get pods

kubectl logs -f docker

kubectl delete pod docker
docker.yml
kubectl create -f docker.yml

kubectl exec -it docker \
    -- docker image ls \
    --format "{{.Repository}}"

kubectl exec docker -it -- sh
Build a docker image inside Pod container
apk add -U git
git clone \
    https://github.com/Faizan-Zia/go-demo-2
cd go-demo-2
Dockerfile
两阶段构建,第一阶段下载代码和依赖,测试并构建二进制文件;第二阶段设置服务,并将第一阶段的代码和二进制文件复制到第二阶段使用。
FROM golang:1.12.6 AS build
ADD . /src
WORKDIR /src
RUN apt update && apt install ca-certificates libgnutls30
RUN go get -d -v
RUN go test --cover -v ./... --run UnitTest
RUN go build -v -o go-demo
FROM alpine:3.4
MAINTAINER Viktor Farcic <[email protected]>
RUN mkdir /lib64 && ln -s /lib/libc.musl-x86_64.so.1 /lib64/ld-linux-x86-64.so.2
EXPOSE 8080
ENV DB db
CMD ["go-demo"]
HEALTHCHECK CMD wget -qO- localhost:8080/demo/hello
COPY /src/go-demo /usr/local/bin/go-demo
RUN chmod +x /usr/local/bin/go-demo
docker image build \
    -t vfarcic/go-demo-2:beta .
docker image ls \
    --format "{{.Repository}}"
实践-部署配置 Prometheus
apiVersion: networking.k8s.io/v1
kind: Ingress
metadata:
  name: prometheus
  annotations:
    kubernetes.io/ingress.class: "nginx"
    ingress.kubernetes.io/ssl-redirect: "false"
    ningxi.ingress.kubernetes.io/ssl-redirect: "false"
spec:
  rules:
  - http:
      paths:
      - path: /prometheus
        pathType: ImplementationSpecific
        backend:
	        service:
	          name: prometheus
	          port:
	            number: 9090

---

apiVersion: apps/v1
kind: Deployment
metadata:
  name: prometheus
spec:
  selector:
    matchLabels:
      type: monitor
      service: prometheus
  strategy:
    type: Recreate
  template:
    metadata:
      labels:
        type: monitor
        service: prometheus
    spec:
      containers:
      - name: prometheus
        image: prom/prometheus:v2.0.0
        command:
        - /bin/prometheus
        args:
        - "--config.file=/etc/prometheus/prometheus.yml"
        - "--storage.tsdb.path=/prometheus"
        - "--web.console.libraries=/usr/share"
        # - "--web.external-url=http://192.168.99.100/prometheus"
        - "--web.external-url=https://ed-5495628439486464_dc.educative.run/prometheus"

---

apiVerwsion: v1
kind: Service
metadata:
  name: prometheus
spec:
  ports:
  - port: 9090
  selector:
    type: monitor
    service: prometheus
kubectl create -f prometheus.yml
kubectl rollout status deploy prometheus
这份文件 prometheus.yml 有一个问题,它运行会出错,原因是我们修改了基本路径 /prometheus, Prometheus 文件尝试从 /metrics 中寻找,不过正确的路径应该是 /prometheus/metrics。
修复 Prometheus 配置,通过挂载进行配置
prometheus.yml
...
apiVersion: apps/v1
kind: Deployment
metadata:
  name: prometheus
spec:
  selector:
    ...
  template:
    ...
    spec:
      containers:
        ...
        volumeMounts:
        - mountPath: /etc/prometheus/prometheus.yml
          name: prom-conf
        volumes:
        - name: prom-config
          hostPath:
            path: /files/prometheus-conf.yml
            type: file
...
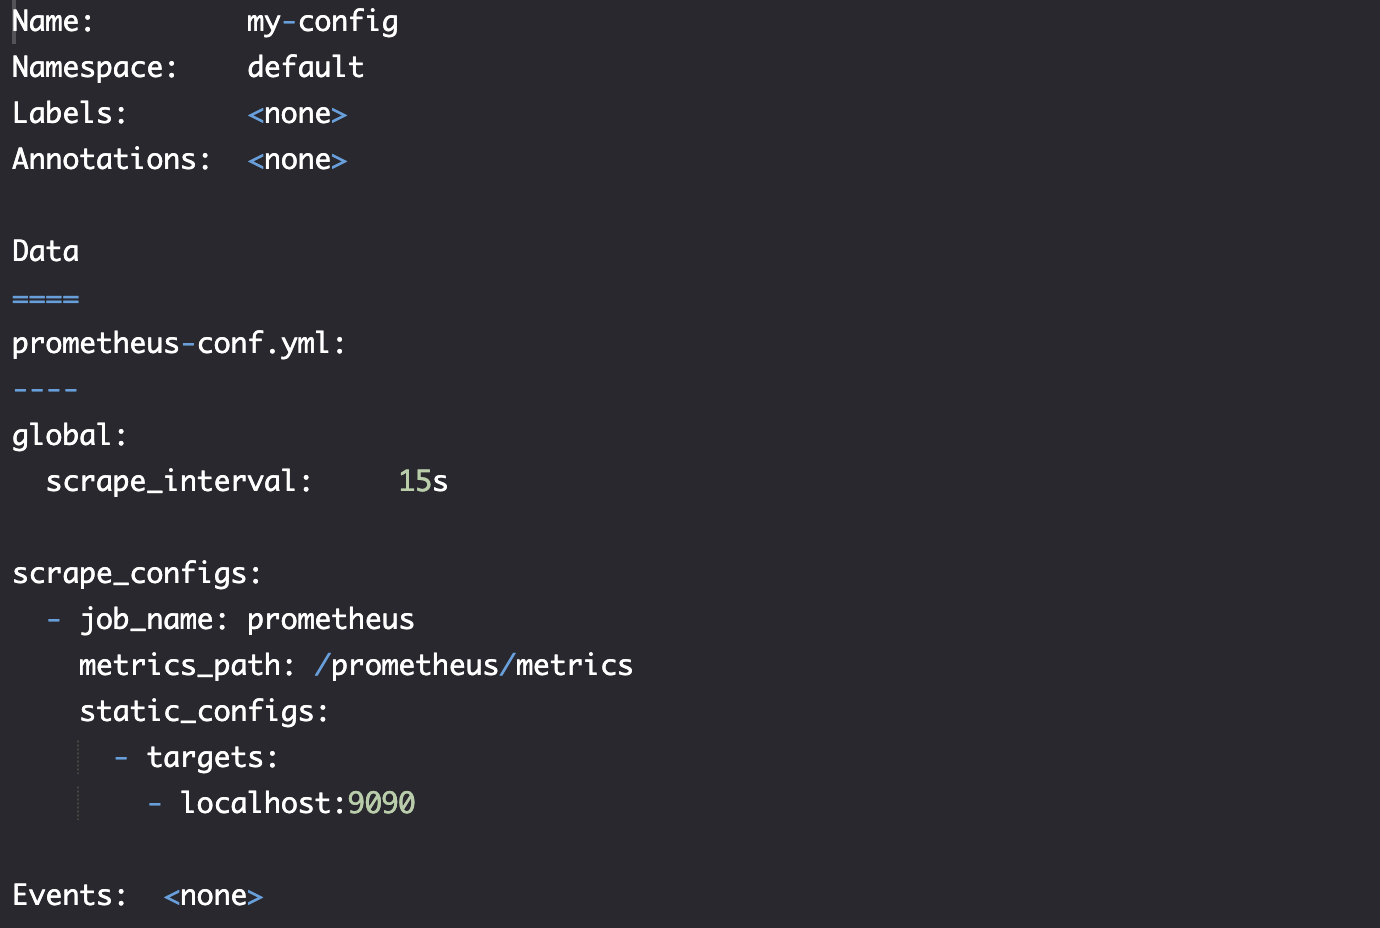
prometheus-conf.yml
global:
  scrape_interval: 15s

scrape_configs:
  - job_name: prometheus
    metrics_path: /prometheus/metrics
    static_configs:
      - targets:
          - localhost:9090
测试配置
kubectl apply -f volume/prometheus-host-path.yml

kubectl rollout status deploy prometheus

kubectl port-forward service/prometheus --address 0.0.0.0  3000:9090

"http://0.0.0.0:3000/prometheus/targets"

通过 hostPath 配置文件是在单节点部署的好办法,但是在多节点服务器上面会遇到麻烦。
- 可以在 Prometheus 官方镜像之上构建 自由配置镜像
- 挂载 nfs 卷类型
- 使用 Kubernetes configMap 组件
实践-部署配置 Jenkins
jenkins.yml
apiVersion: networking.k8s.io/v1
kind: Ingress
metadata:
  name: jenkins
  annotations:
    kubernetes.io/ingress.class: "nginx"
    ingress.kubernetes.io/ssl-redirect: "false"
    nginx.ingress.kubernetes.io/ssl-redirect: "false"
spec:
  rules:
    - http:
        paths:
          - path: /jenkins
            pathType: ImplementationSpecific
            backend:
              service:
                name: jenkins
                port:
                  number: 8080
---
apiVersion: apps/v1
kind: Deployment
metadata:
  name: jenkins
spec:
  selector:
    matchLabels:
      type: master
      service: jenkins
  strategy:
    type: Recreate
  template:
    metadata:
      labels:
        type: master
        service: jenkins
    spec:
      containers:
        - name: jenkins
          image: vfarcic/jenkins
          env:
            - name: JENKINS_OPTS
              value: --prefix=/jenkins
---
apiVersion: v1
kind: Service
metadata:
  name: jenkins
spec:
  ports:
    - port: 8080
  selector:
    type: master
    service: jenkins
创建
kubectl create \
-f jenkins.yml \
--record --save-config
kubectl rollout status deploy jenkins
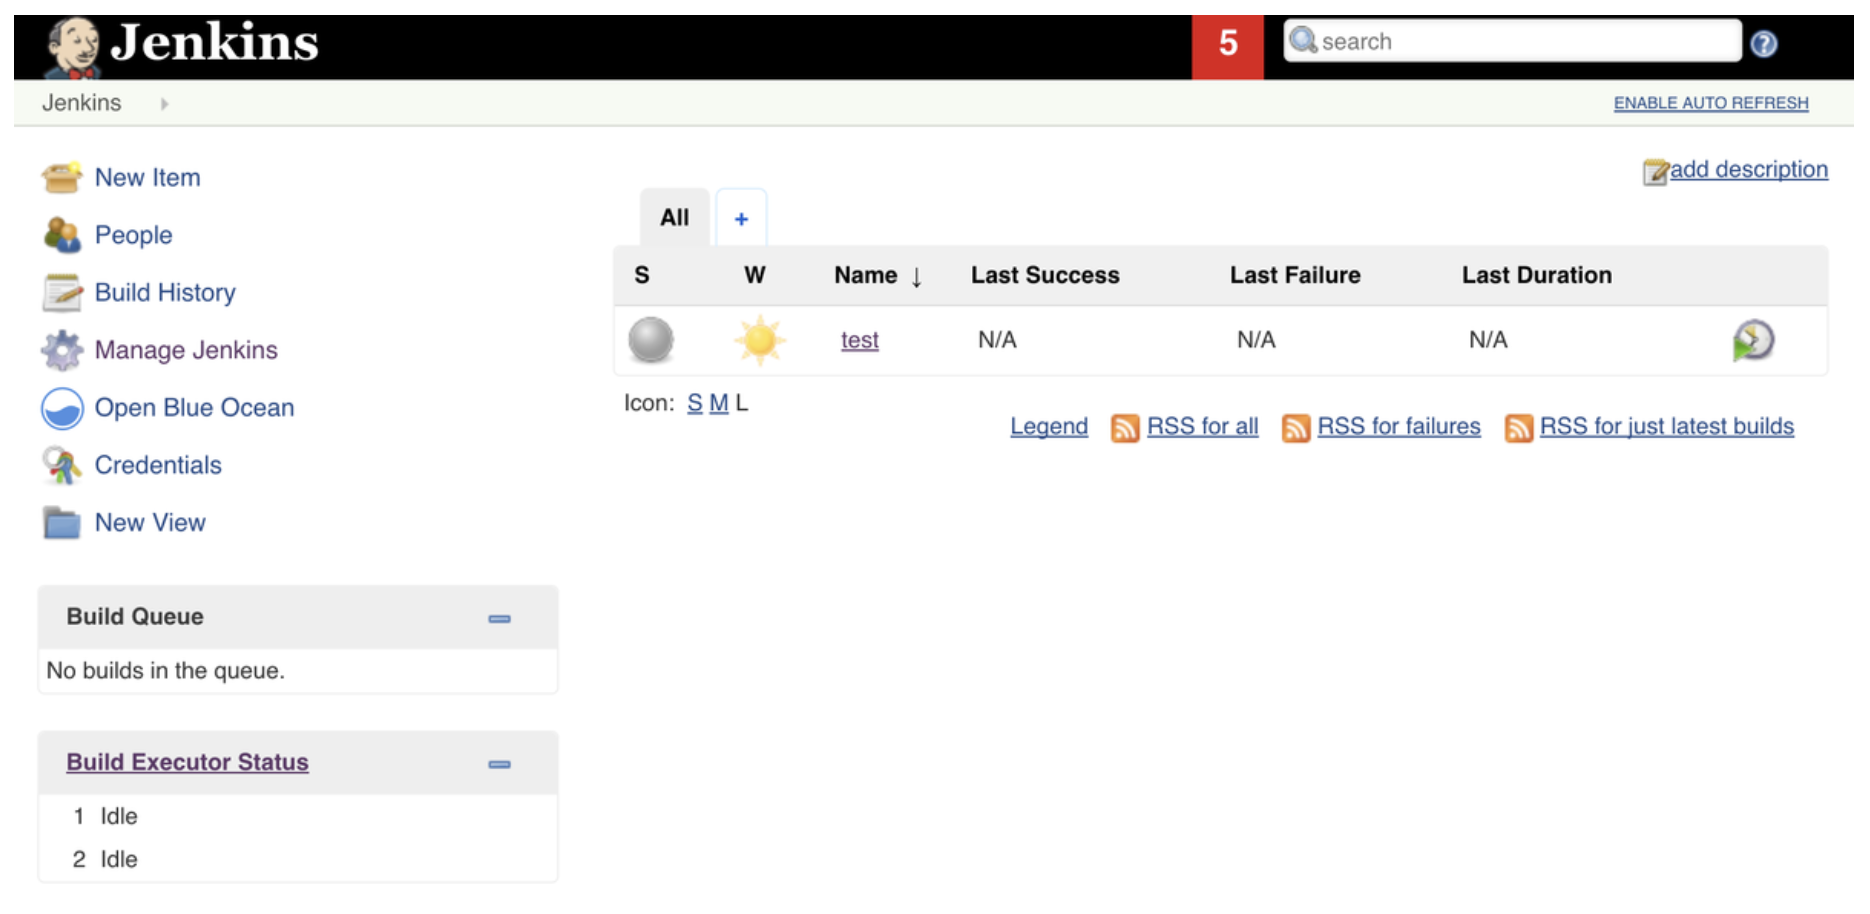
kubectl port-forward service/jenkins 3000:8080 --address 0.0.0.0
# click the link besides run button
创建 Job 后,终止 Jenkins Pod,分析其状态
POD_NAME=$(kubectl get pods \
    -l service=jenkins,type=master \
    -o jsonpath="{.items[*].metadata.name}")

kubectl exec $POD_NAME -it -- kill 1
终止后,kubernetes 会检测到故障并重新创建新的 Jenkins Pod (RESTARTS+1)

可是新 Pod 并没有包含之前创建的 job。为了保存 状态,我们可以增加 Volume。
jenkins-empty-dir.yml
...
kind: Deployment
...
spec:
  ...
  template:
    ...
    spec:
      containers:
        ...
        volumeMounts:
        - mountPath: /var/jenkins_home
          name: jenkins-home
      volumes:
      - name: jenkins-home
        emptyDir: {}
...
kubectl apply \
    -f jenkins-empty-dir.yml

kubectl rollout status deploy jenkins

kubectl port-forward service/jenkins 3000:8080 --address 0.0.0.0

POD_NAME=$(kubectl get pods \
    -l service=jenkins,type=master \
    -o jsonpath="{.items[*].metadata.name}")

kubectl exec -it $POD_NAME kill 1

kubectl get pods

# Pod is restarted

kubectl port-forward service/jenkins 3000:8080 --address 0.0.0.0
ConfigMaps
结构流程

定义
ConfigMaps 使我们能够将配置与应用程序镜像分离。当其他替代方案不适用时,这种分离非常有用。
ConfigMap 允许我们将配置“注入”到容器中。配置的来源可以是文件、目录或文本值。目标可以是 files 或 environment variables。
注意:ConfigMap 从源获取配置,并将其作为卷挂载到正在运行的容器中。
将测试版本作为持续部署过程的一部分进行部署并不是命名空间的唯一用途。在许多其他情况下,它们可能很有用。例如,我们可以为组织中的每个团队提供一个单独的命名空间。或者我们可以根据应用程序的类型(例如,监控、持续部署、后端等)将集群拆分为 Namespaces。
命名空间背后的真正强大之处在于它们与授权策略和约束相结合。
指令
kubectl config current-context
实践-单文件注入配置
kubectl create cm my-config \
    --from-file=prometheus-conf.yml

kubectl describe cm my-config
挂载 ConfigMap in alpine.yml
apiVersion: v1
kind: Pod
metadata:
  name: alpine
sepc:
  containers:
    - name: alpine
      image: alpine
      command: ["sleep"]
      args: ["100000"]
      volumeMounts:
        - name: config-vol
          mountPath: /etc/config
  volumes:
    - name: config-vol
      configMap:
        name: my-config
kubectl create -f alpine.yml
kubectl get pods

kubectl exec -it alpine -- \
    ls /etc/config
kubectl exec -it alpine --  \
  ls -l /etc/config

kubectl exec -it alpine -- \
    cat /etc/config/prometheus-conf.yml


实践-多文件注入配置
kubectl create cm my-config \
    --from-file=cm/prometheus-conf.yml \
    --from-file=cm/prometheus.yml

kubectl create -f cm/alpine.yml

#Run the following command separately
kubectl exec -it alpine -- \
    ls /etc/config

实践-目录注入配置
从目录中创建 configMap
# cm 是个文件夹
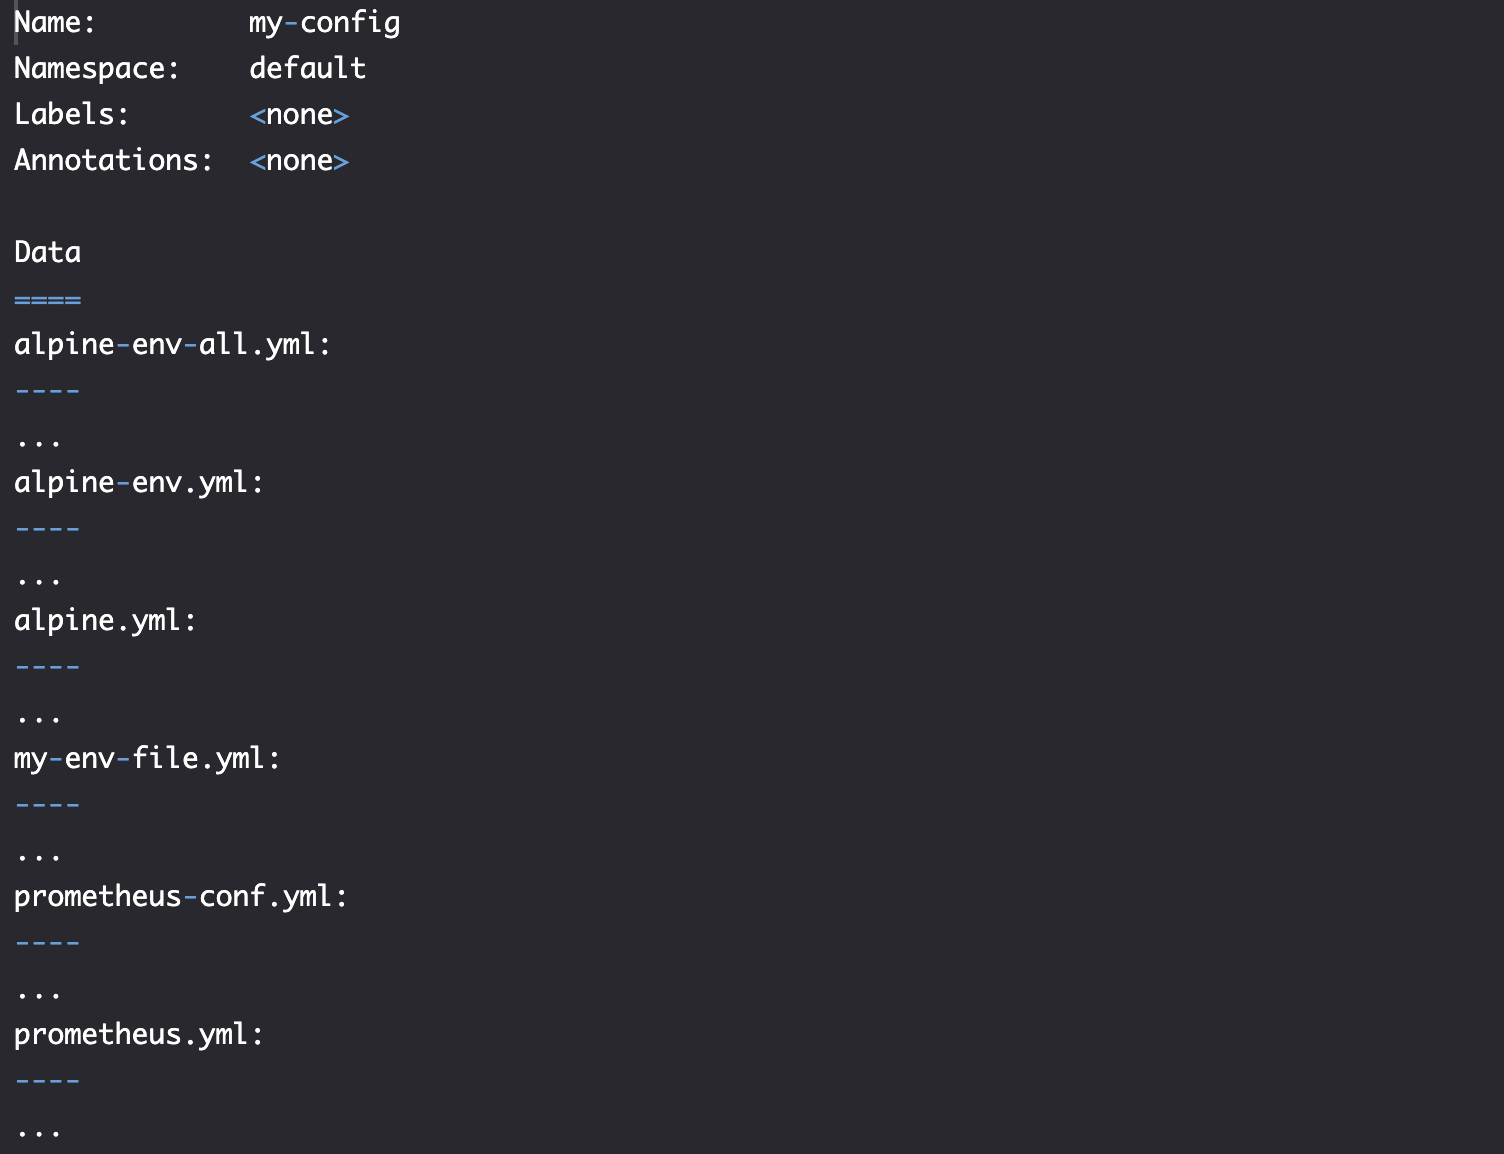
kubectl create cm my-config \
--from-file=cm
kubectl describe cm my-config
实践-Key/Value 文字注入配置
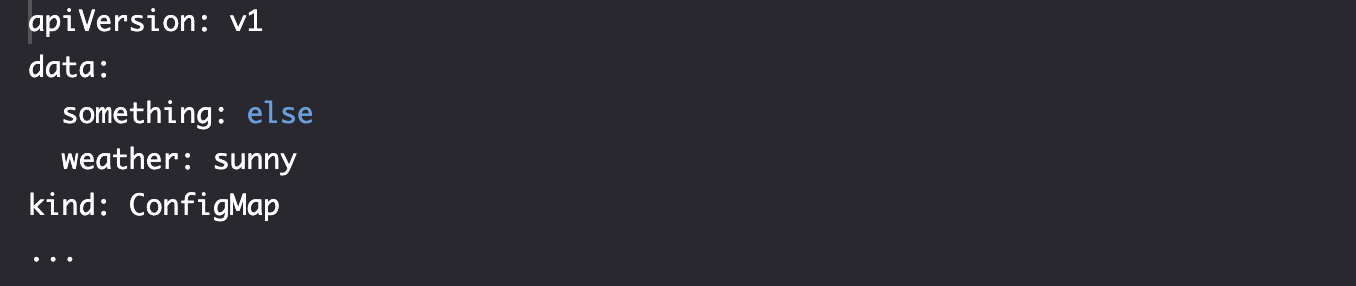
kubectl create cm my-config \
    --from-literal=something=else \
    --from-literal=weather=sunny

kubectl get cm my-config -o yaml
实践-环境变量注入配置
my-env-file.yml
something=else
weather=sunny
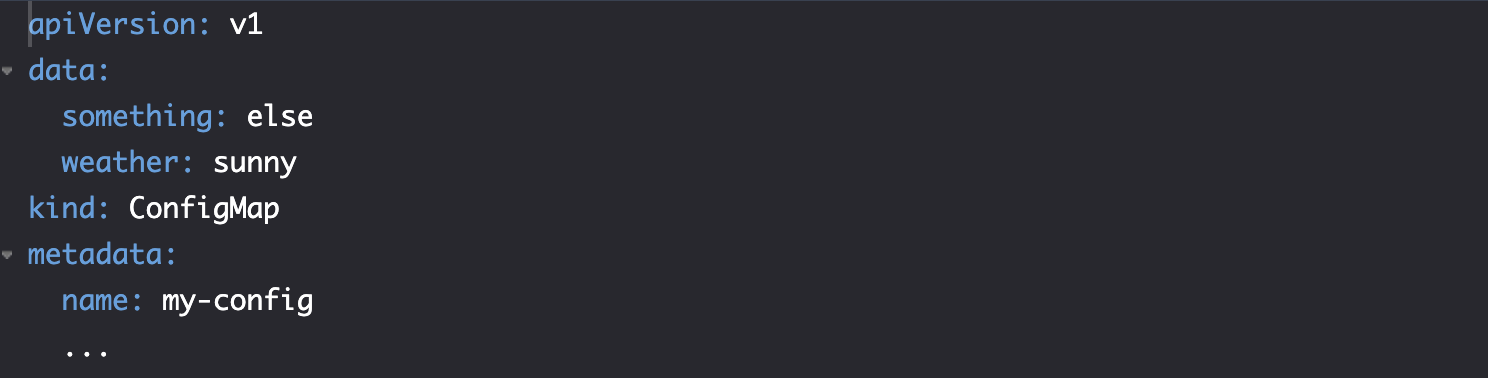
kubectl create cm my-config \
    --from-env-file=my-env-file.yml

kubectl get cm my-config -o yaml
实践-将 ConfigMap 输出为环境变量
alpine-env.yml
apiVersion: v1
kind: Pod
metadata:
  name: alpine-env
spec:
  containers:
    - name: alpine
      image: alpine
      command: ["sleep"]
      args: ["100000"]
      env:
        - name: something
          valueFrom:
            configMapKeyRef:
              name: my-config
              key: something
        - name: weather
          valueFrom:
            configMapKeyRef:
              name: my-config
              key: weather
kubectl create \
    -f alpine-env.yml
#Wait for a few seconds before executing the below command
kubectl exec -it alpine-env -- env

另一种定义方式
alpine-env-all.yml
apiVersion: v1
kind: Pod
metadata:
  name: alpine-env
spec:
  containers:
    - name: alpine
      image: alpine
      command: ["sleep"]
      args: ["100000"]
      envFrom:
        - configMapRef:
            name: my-config
实践-将 ConfigMap 输出为 yaml 文件
kubectl get cm my-config -o yaml
实践-使用 ConfigMap 配置部署 Prometheus
prometheus.yml
apiVersion: networking.k8s.io/v1
kind: Ingress
metadata:
  name: prometheus
  annotations:
    kubernetes.io/ingress.class: "nginx"
    ingress.kubernetes.io/ssl-redirect: "false"
    nginx.ingress.kubernetes.io/ssl-redirect: "false"
spec:
  rules:
    - http:
        paths:
          - path: /prometheus
            pathType: ImplementationSpecific
            backend:
              service:
                name: prometheus
                port:
                  number: 9090

---
apiVersion: apps/v1
kind: Deployment
metadata:
  name: prometheus
spec:
  selector:
    matchLabels:
      type: monitor
      service: prometheus
  strategy:
    type: Recreate
  template:
    metadata:
      labels:
        type: monitor
        service: prometheus
    spec:
      containers:
        - name: prometheus
          image: prom/prometheus:v2.0.0
          command:
            - /bin/prometheus
          args:
            - "--config.file=/etc/prometheus/prometheus.yml"
            - "--storage.tsdb.path=/prometheus"
            - "--web.console.libraries=/usr/share"
            - "--web.external-url=https://ed-5495628439486464_dc.educative.run/prometheus"
          volumeMounts:
            - mountPath: /etc/prometheus
              name: prom-conf
      volumes:
        - name: prom-conf
          configMap:
            name: prom-conf

---
apiVersion: v1
kind: Service
metadata:
  name: prometheus
spec:
  ports:
    - port: 9090
  selector:
    type: monitor
    service: prometheus

---
apiVersion: v1
kind: ConfigMap
metadata:
  name: prom-conf
data:
  prometheus.yml: |
    global:
      scrape_interval:     15s

    scrape_configs:
      - job_name: prometheus
        metrics_path: /prometheus/metrics
        static_configs:
          - targets:
            - localhost:9090
kubectl get cm my-config -o yaml

kubectl create -f prometheus.yml

kubectl rollout status deploy prometheus

# please wait for deployments to successfully roll out before running the following command:
kubectl port-forward service/prometheus 3000:9090 --address 0.0.0.0
问题-什么时候使用 ConfigMap?
- 保留配置文件的重要性:无论采用哪种策略,每个容器镜像都应包含带有合理默认值的配置文件副本。
- 双源配置加载策略:建议改进应用程序设计,使其能够从两个位置加载配置:
- 一个文件提供默认值
- 另一个文件提供差异配置 这样可以减少每个集群需要指定的最小配置量。
- ConfigMap 的使用建议:
- 推荐使用
--from-literal和--from-env-file作为配置来源 - 当其他方法不适用时,可以使用
--from-file
- 推荐使用
- 重要注意事项:
- 避免将 ConfigMap 定义与挂载它的对象放在同一个文件中
- 否则会导致配置只能在单个集群中使用
- 如果出现跨集群部署相同配置的情况,应该考虑将配置直接打包到镜像中
核心思想是:在保持配置灵活性的同时,寻求减少冗余配置的方法,并根据不同场景选择合适的配置管理策略。
Secrets
结构流程
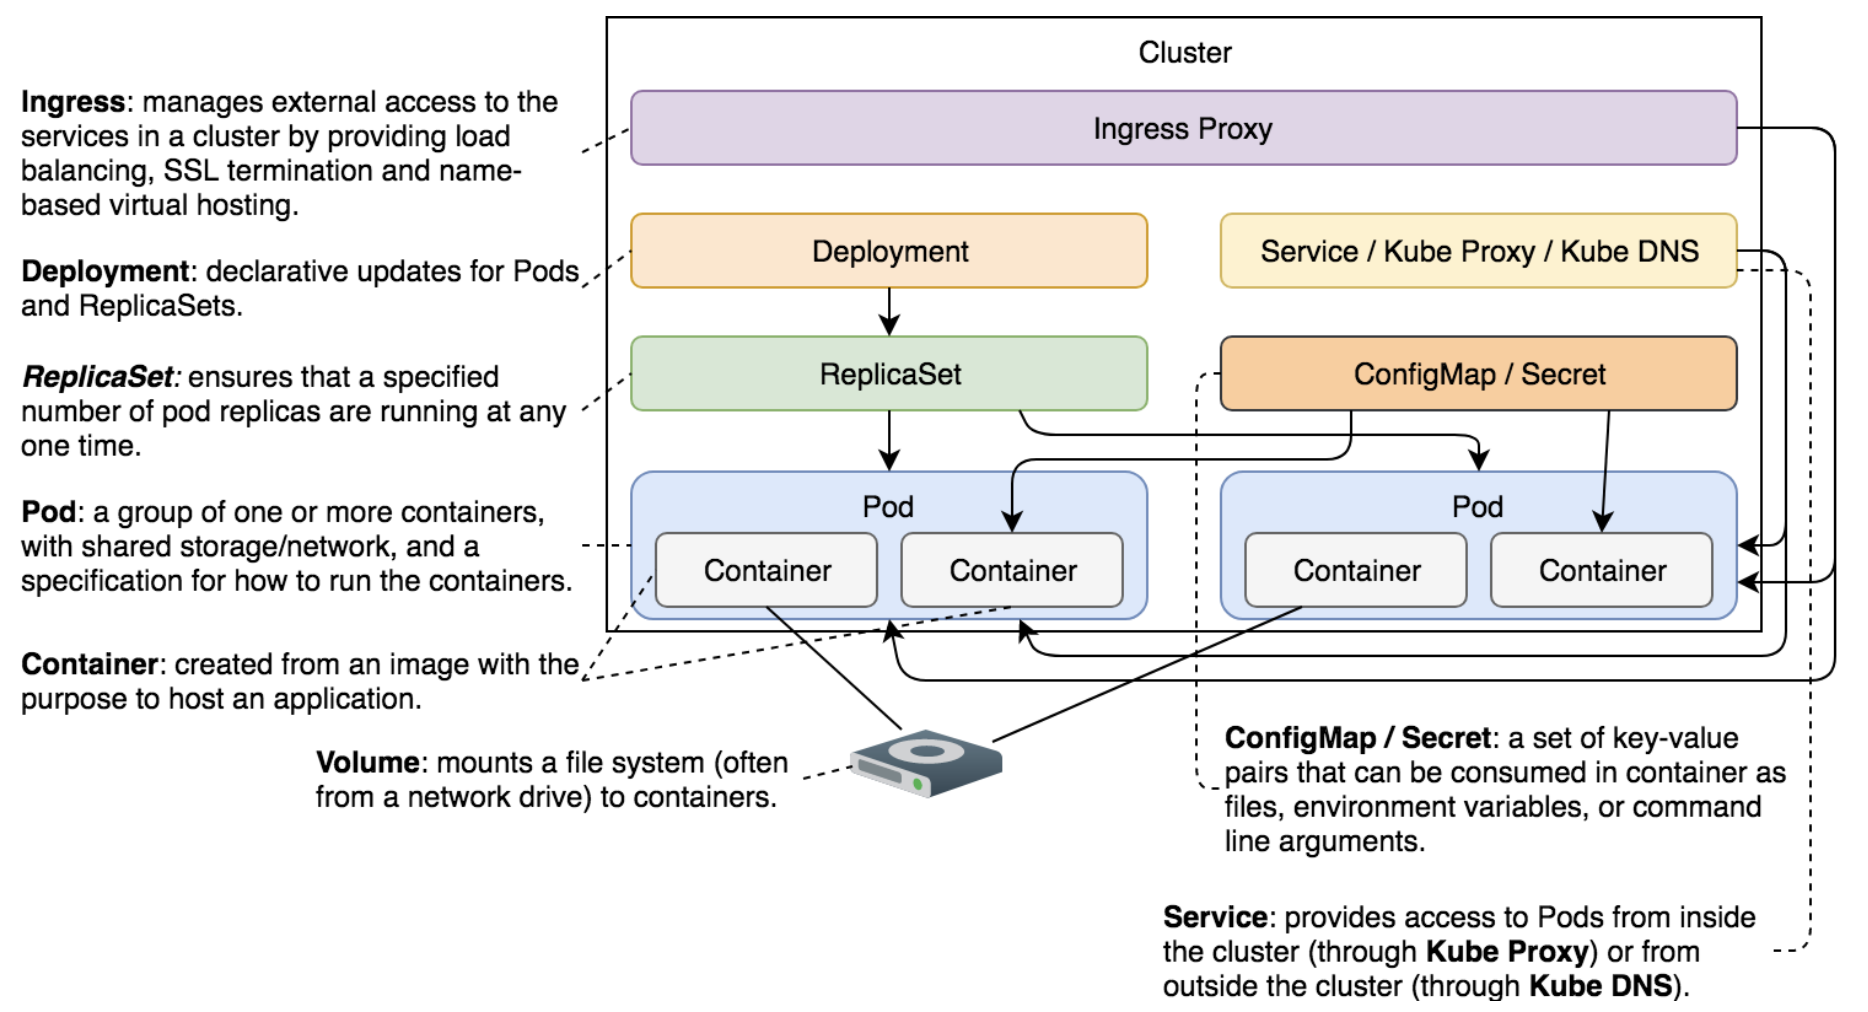
定义
与 ConfigMap 创建方法一样,需要制定类型 generic。
kubectl create secret generic <secretname>
定义-与 ConfigMap 的差异
几乎相同。
Secret 存储在内存中(tmpfs),在主机文件系统上不会留下任何痕迹。我们还需要与 "Authorization Plicies" 结合以保证 Secret 的安全。
实践-创建为被保护的 jenkins 服务
jenkins-unprotedted.yml
apiVersion: networking.k8s.io/v1
kind: Ingress
metadata:
  name: jenkins
  annotations:
    kubernetes.io/ingress.class: "nginx"
    ingress.kubernetes.io/ssl-redirect: "false"
    nginx.ingress.kubernetes.io/ssl-redirect: "false"
spec:
  rules:
  - http:
      paths:
      - path: /jenkins
        pathType: ImplementationSpecific
        backend:
          service:
            name: jenkins
            port:
              number: 8080

---

apiVersion: apps/v1
kind: Deployment
metadata:
  name: jenkins
spec:
  selector:
    matchLabels:
      type: master
      service: jenkins
  strategy:
    type: Recreate
  template:
    metadata:
      labels:
        type: master
        service: jenkins
    spec:
      containers:
      - name: jenkins
        image: vfarcic/jenkins
        env:
        - name: JENKINS_OPTS
          value: --prefix=/jenkins
        volumeMounts:
        - mountPath: /var/jenkins_home
          name: jenkins-home
      volumes:
      - emptyDir: {}
        name: jenkins-home

---

apiVersion: v1
kind: Service
metadata:
  name: jenkins
spec:
  ports:
  - port: 8080
  selector:
    type: master
    service: jenkins
实践-创建通用密匙
--from-env-file, --from-file, --from-literal
kubectl create secret \
    generic my-creds \
    --from-literal=username=jdoe \
    --from-literal=password=incognito

kubectl get secrets

kubectl get secret my-creds -o json

kubectl get secret my-creds \
    -o jsonpath="{.data.username}" \
    | base64 --decode

kubectl get secret my-creds \
    -o jsonpath="{.data.password}" \
    | base64 --decode
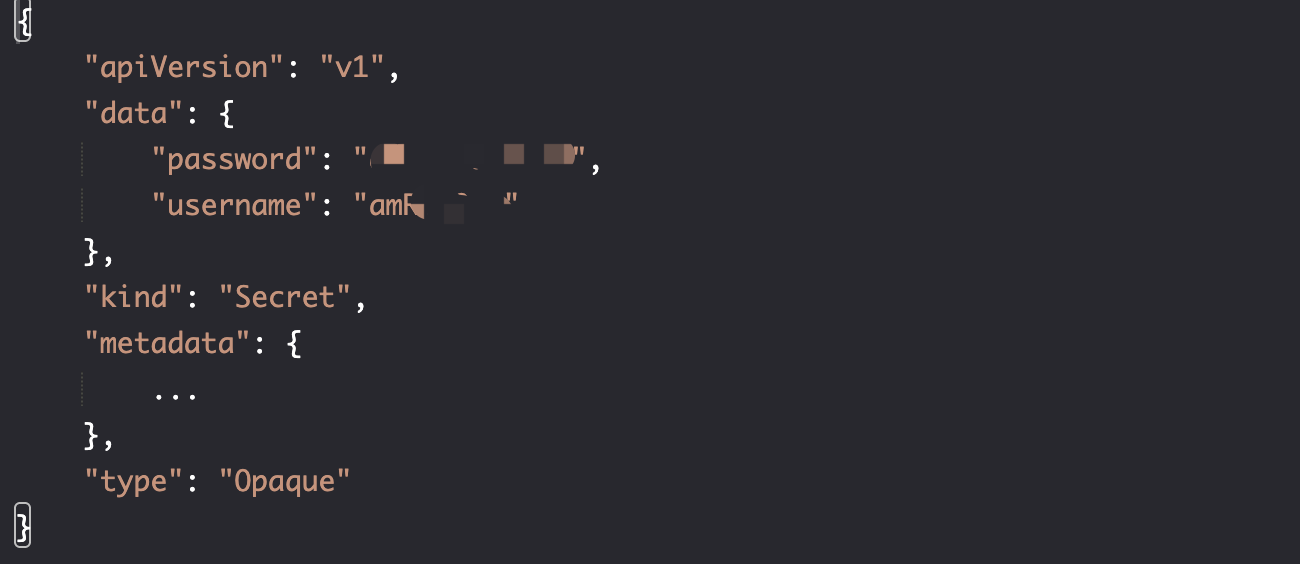
这些值是编码的,通过 base64 --decode 可以看到原始值。
实践-挂载通用密匙
jenkins.yml
apiVersion: apps/v1
kind: Deployment
metadata:
  name: jenkins
spec:
  ...
  template:
    ...
    spec:
      containers:
      - name: jenkins
        image: vfarcic/jenkins
        env:
        - name: JENKINS_OPTS
          value: --prefix=/jenkins
        volumeMounts:
        - name: jenkins-home
          mountPath: /var/jenkins_home
        - name: jenkins-creds
          mountPath: /etc/secrets
      volumes:
      - name: jenkins-home
        emptyDir: {}
      - name: jenkins-creds
        secret:
          secretName: my-creds
          defaultMode: 0444
          items:
          - key: username
            path: jenkins-user
          - key: password
            path: jenkins-pass
...
kubectl apply -f jenkins.yml

kubectl rollout status deploy jenkins

POD_NAME=$(kubectl get pods \
    -l service=jenkins,type=master \
    -o jsonpath="{.items[*].metadata.name}")

kubectl exec -it $POD_NAME \
    -- ls /etc/secrets

kubectl exec -it $POD_NAME \
    -- cat /etc/secrets/jenkins-user

kubectl port-forward service/jenkins 3000:8080 --address 0.0.0.0

k3d cluster delete mycluster --all
安全-保护 Secrets 的方法
k8s 所有数据存在 etcd 中,etcd 以纯文本形式将数据存在磁盘上:
- 使用 SSL/TLS 保护 etcd 实例之间的通信
- 限制对 etcd 访问,并擦出其使用的磁盘或分区
- 不要再 yaml 中定义密匙,而是通过
kubectl create secret创建,最好之后删除命令历史记录 - 确保应用程序日志或者传输过程中不会输出 Secret
- 创建仅允许受信任的用户检索密钥的策略。即使有,任何有权运行 Pod 的用户都可以挂载 Secret 并读取
Namespaces
问题-为什么要创建多个集群?
- 不同集群为不同的团队、不同环境服务
- 避免集群中设置互相影响
- 避免产生资源争夺,影响集群性能与测试,导致集群变慢
除此之外,Namespaces 会是一个有用的策略。命名空间允许我们做什么?
- 允许我们在不同的用户组之间拆分集群
- 每个命名空间可以具有不同的权限和资源配额
- 如果我们将命名空间与其他 Kubernetes 服务和概念相结合,完成很多其他事情
结构流程
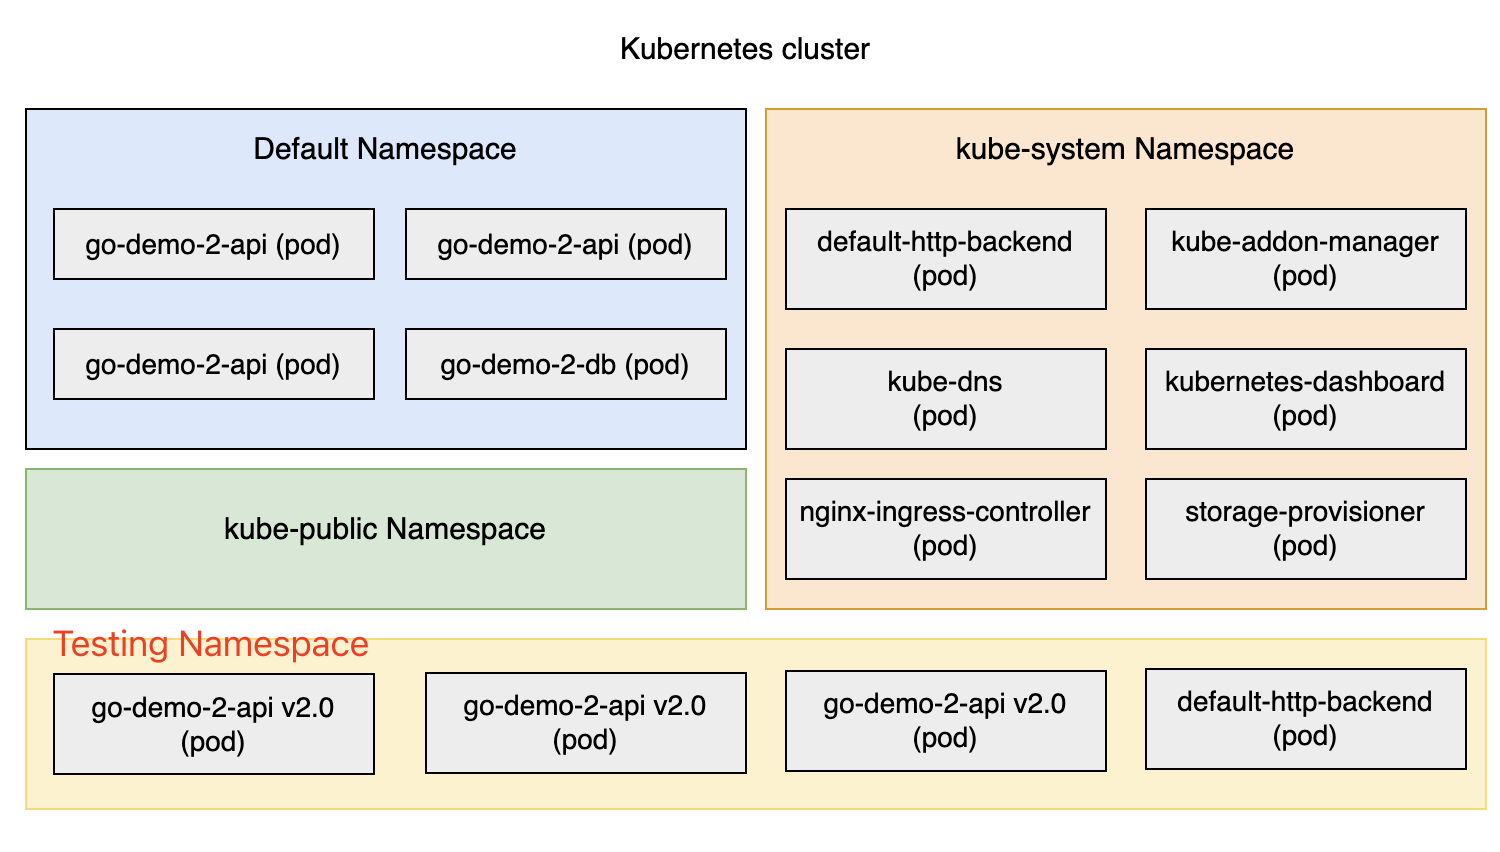
定义-自带命名空间
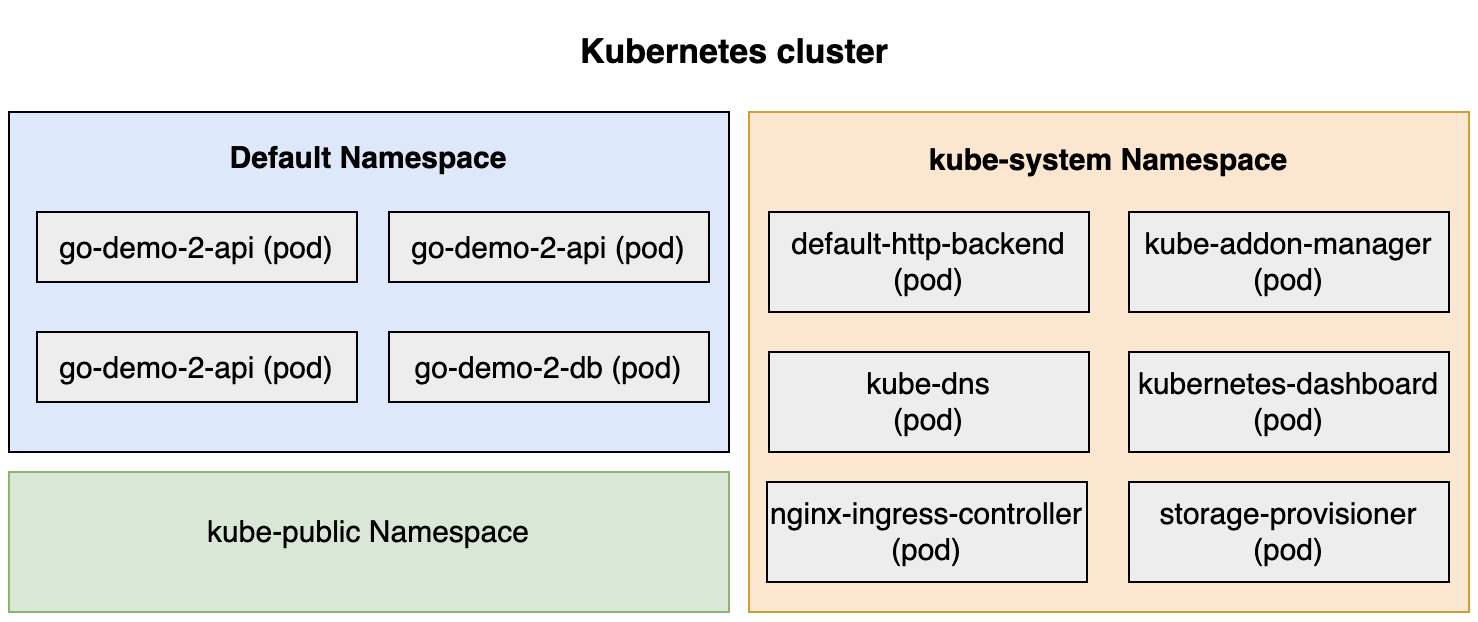
到目前为止我们执行的所有命令都在默认 default的 Namespace 中创建了对象。
kubectl get ns

kubectl --namespace kube-public get all
kube-public 命名空间中的对象在整个集群中可见,比如 我们可以创建一个全部命名空间可见的 ConfigMap。
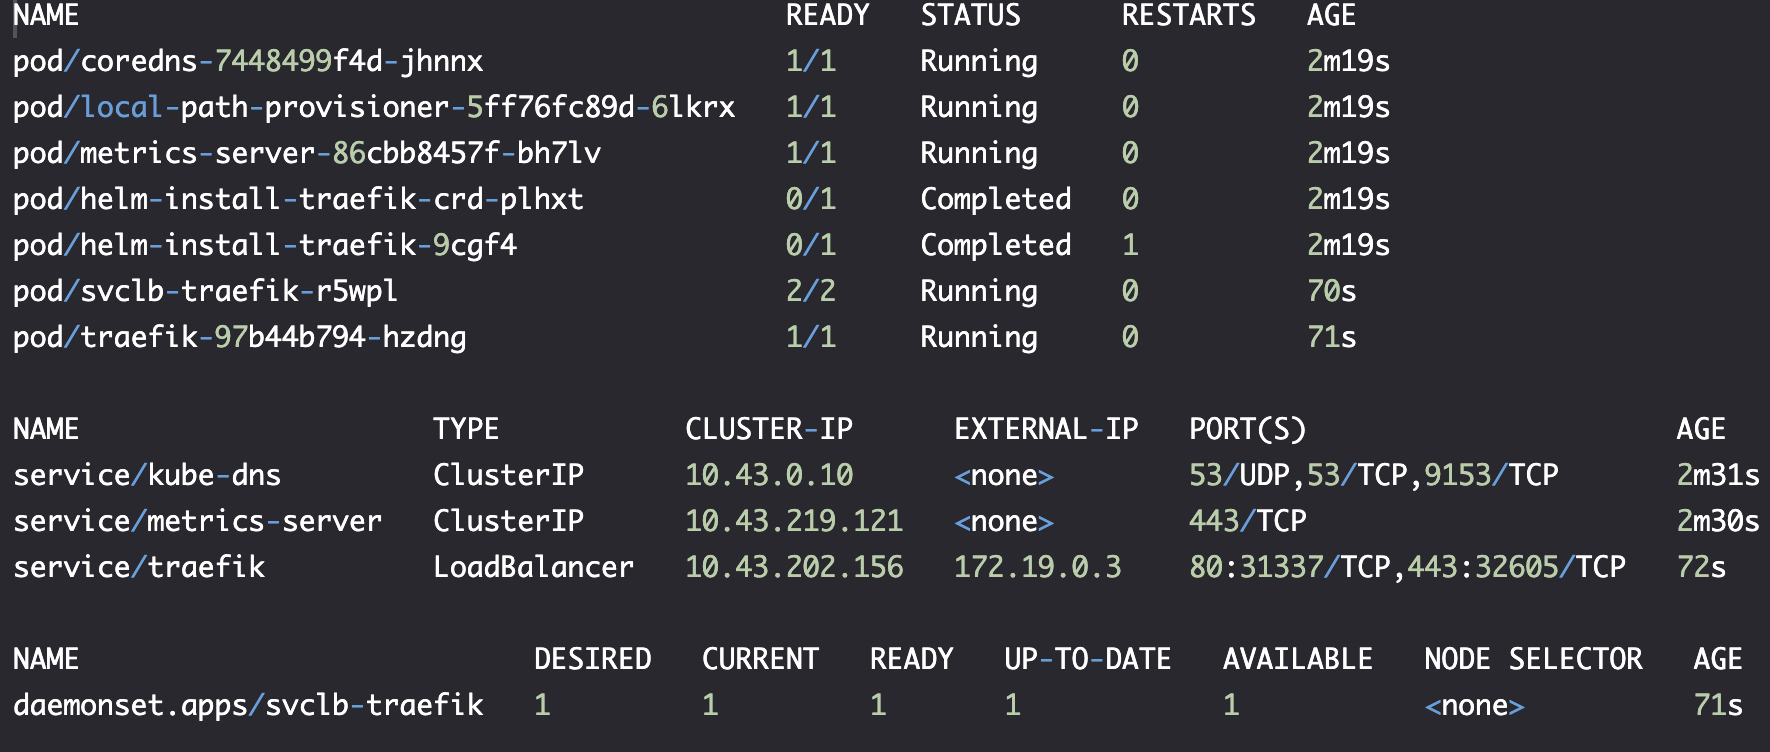
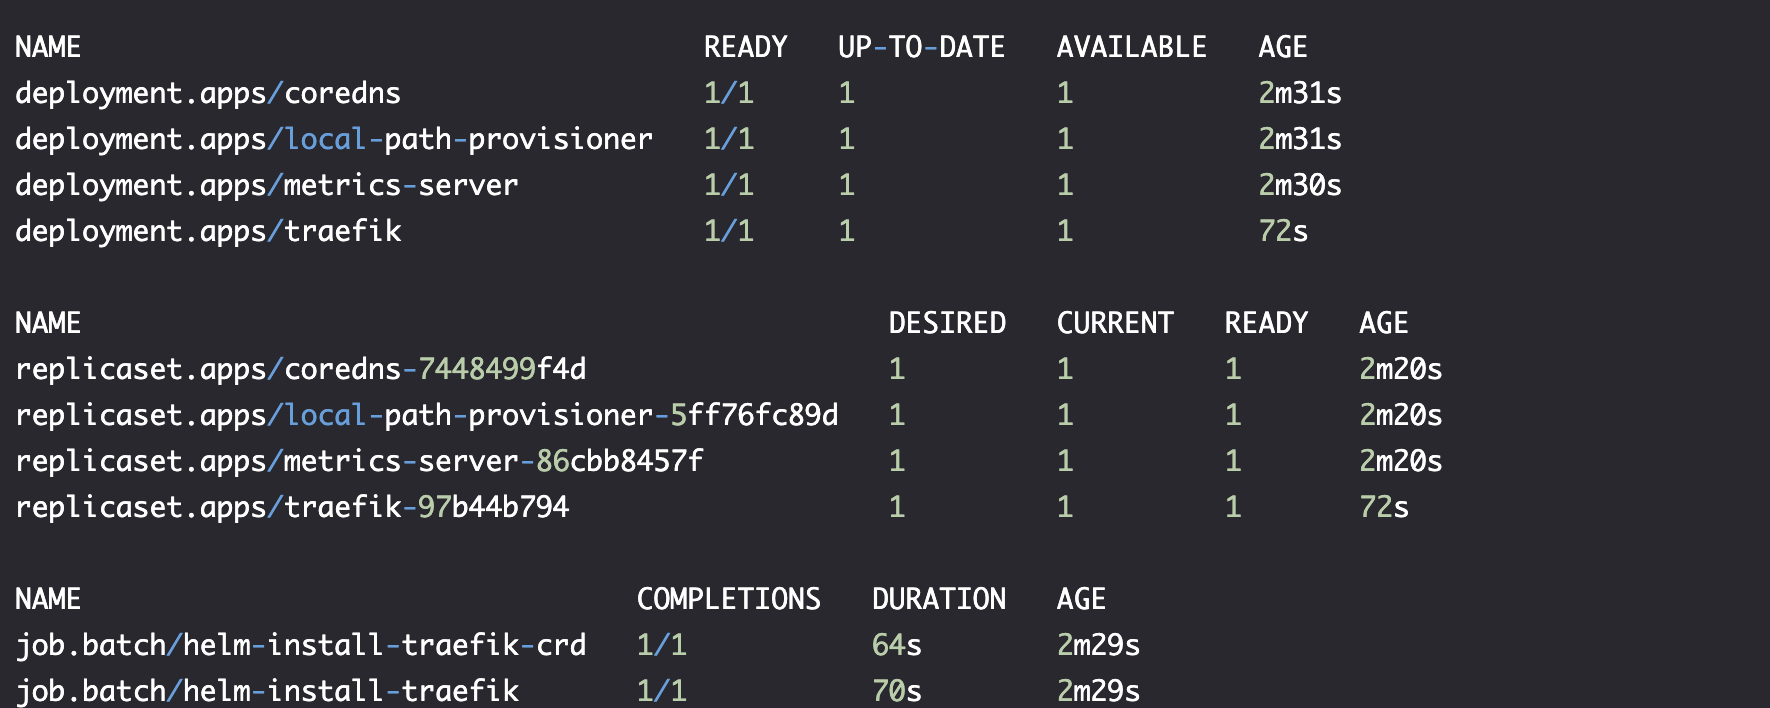
kubectl --namespace kube-system get all
kube-system 命名空间至关重要。Kubernetes 需要的几乎所有对象和资源都在 kube-system 命名空间内运行。
实践-测试程序定义
go-demo-2.yml
apiVersion: networking.k8s.io/v1
kind: Ingress
metadata:
  name: go-demo-2
  annotations:
    kubernetes.io/ingress.class: "nginx"
    ingress.kubernetes.io/ssl-redirect: "false"
    nginx.ingress.kubernetes.io/ssl-redirect: "false"
spec:
  rules:
  - host: go-demo-2.com
    http:
      paths:
      - path: /demo
        pathType: ImplementationSpecific
        backend:
          service:
            name: go-demo-2-api
            port:
              number: 8080

---

apiVersion: apps/v1
kind: Deployment
metadata:
  name: go-demo-2-db
spec:
  selector:
    matchLabels:
      type: db
      service: go-demo-2
  strategy:
    type: Recreate
  template:
    metadata:
      labels:
        type: db
        service: go-demo-2
        vendor: MongoLabs
    spec:
      containers:
      - name: db
        image: mongo:3.3

---

apiVersion: v1
kind: Service
metadata:
  name: go-demo-2-db
spec:
  ports:
  - port: 27017
  selector:
    type: db
    service: go-demo-2

---

apiVersion: apps/v1
kind: Deployment
metadata:
  name: go-demo-2-api
spec:
  replicas: 3
  selector:
    matchLabels:
      type: api
      service: go-demo-2
  template:
    metadata:
      labels:
        type: api
        service: go-demo-2
        language: go
    spec:
      containers:
      - name: api
        image: vfarcic/go-demo-2
        env:
        - name: DB
          value: go-demo-2-db
        readinessProbe:
          httpGet:
            path: /demo/hello
            port: 8080
          periodSeconds: 1
        livenessProbe:
          httpGet:
            path: /demo/hello
            port: 8080

---

apiVersion: v1
kind: Service
metadata:
  name: go-demo-2-api
spec:
  ports:
  - port: 8080
  selector:
    type: api
    service: go-demo-2
实践-创建并切换到新命名空间
kubectl create ns testing
kubectl get ns

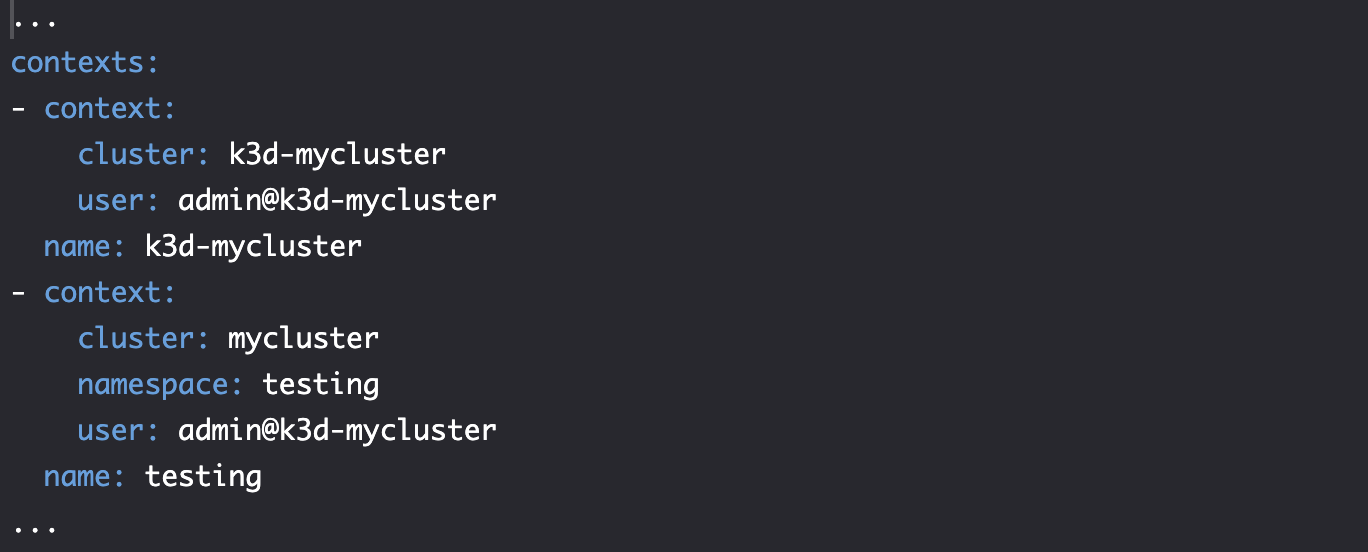
创建 testing 上下文 context
kubectl config set-context testing \
    --namespace testing \
    --cluster k3d-mycluster \
    --user admin@k3d-mycluster

kubectl config view
切换上下文 context
kubectl config use-context testing
切换后,所有的指令默认在 testing 的命名空间中运行。
实践-在新命名空间中创建测试程序
在 testing 命名空间中部署程序
IMG=vfarcic/go-demo-2

TAG=2.0

DOM=go-demo-2.com

cat go-demo-2.yml \
    | sed -e \
    "s@image: $IMG@image: $IMG:$TAG@g" \
    | sed -e \
    "s@host: $DOM@host: $TAG\.$DOM@g" \
    | kubectl create -f -


kubectl rollout status \
    deploy go-demo-2-api

确保新旧版本服务在线
nohup kubectl port-forward -n ingress-nginx service/ingress-nginx-controller 3000:80 --address 0.0.0.0  > /dev/null 2>&1

curl -H "Host: go-demo-2.com"     "http://0.0.0.0:3000/demo/hello"

curl -H "Host: 2.0.go-demo-2.com"     "http://0.0.0.0:3000/demo/hello"


结构流程
实践-命名空间之间的通信
kubectl config use-context k3d-mycluster

kubectl run test \
    --image=alpine \
    sleep 10000
test pod 创建后,建立通信
kubectl exec -it test \
    -- apk add -U curl

kubectl exec -it test -- curl \
    "http://go-demo-2-api:8080/demo/hello"
test pod 与 go-demo-2-api 同命名空间,可以直接通过域名访问。
因为创建go-demo-2-api svc 时,会自动生成 DNS,实际的条目是 go-demo-2-api.svc.cluster.local, 也被解析为 go-demo-2-api` svc。
- DNS 格式:
<service-name>.<namespace-name>.svc.cluster.local-->go-demo-2-api.default.svc.cluster.local--> |simple version|go-demo-2-api.default - 在同一命名空间的通信,没必要使用
<service-name>.<namespace-name>格式。
如果我们想在 default 命名空间测试 访问 testing 命名空间运行的 go-demo-2-api,应该使用 go-demo-2-api.testing.svc.cluster.local DNS,或者更好的是,使用较短的版本 go-demo-2-api.testing。
kubectl exec -it test -- curl \
    "http://go-demo-2-api.testing:8080/demo/hello"
这一切由 Kube DNS 组件来 forward 相关请求。
实践-删除命名空间
kubectl delete ns testing
kubectl -n testing get all
命名空间的另一个方便特性是它们的级联效果(cascade)。例如,如果我们删除 testing 命名空间,则所有对象和在其中运行的资源也将被删除。
