Kubernetes 理论与实践-1-基础-Pods, ReplicaSets, Services, Deployments
一点历史
- 在物理服务器时代,基础设施管理和部署是合在一起的,因为所有的设置是不可变的,只要安装后基本不会改变;有了 VM 和 镜像后,基础设置管理和部署可以分开,这就能够让原本在福 wish 昂不可变的应用设置获得一定程度的可变性。
- 后来,Chef, Puppet, Ansible 陆续发展以支持基础设施管理(基础设施状态管理),但是却没有花更多到部署那块。为了支持可变性,Packer 应运而生;发展至今,现在的答案是 Terraform, Packer, CloudFormation。
- 部署流程中,在 Docker 和容器没有出现之前,我们有 Linux 和 cGroup,但是它很难用;再之前是一堆专注于基础设置管理的软件(Puppet, CFEngine, SALTSTACK, Chef, Ansible)。
- Docker(容器运行时) 和容器的出现,保证了 容器景象是不可变的情况下,给部署流程带来拥抱可变性的可能;容器很好,不过直接运行容器并不会让你获得高容错和自愈功能,因此需要有一个东西充分利用和安排它们配置到合适的地点,从而体现出扩展性、高稳定性和高可用性。
- 有了容器之后,部署流程可变后,Schdulers 调度器程序 (MESOS, MARATHON, Docker Swarm, Kubernetes) 应运而生;调度器管理一个集群内多个应用之间的部署交互;
Kubernetes 特性
- 我们可以用它来部署服务、无停机发布新版本,并实现服务的弹性扩缩容。
- 它具有可移植性。
- 可在公有云或私有云环境运行。
- 支持本地部署或混合云架构。
- 我们能在不同托管服务商间迁移 Kubernetes 集群,而几乎无需调整原有部署和管理流程。
- Kubernetes 具有高度可扩展性,能通过模块化组合满足多样化需求。既可选用现有模块,也能自主开- 功能插件。
- 它能自动调度工作负载并维持声明式状态。
- Kubernetes 会将服务副本部署至最优节点,按需重启、复制及扩缩容。
- 自修复能力是其原生设计特性,自适应功能也即将实现。
- 零停机部署、容错机制、高可用性、弹性伸缩、智能调度和自修复等特性大幅提升了 Kubernetes 的- 值。
- 支持为有状态应用挂载存储卷。
- 可将敏感信息加密存储为密钥。
- 提供服务健康状态校验功能。
- 具备请求负载均衡和资源监控能力。
- 提供服务发现机制和便捷的日志访问渠道。
环境准备
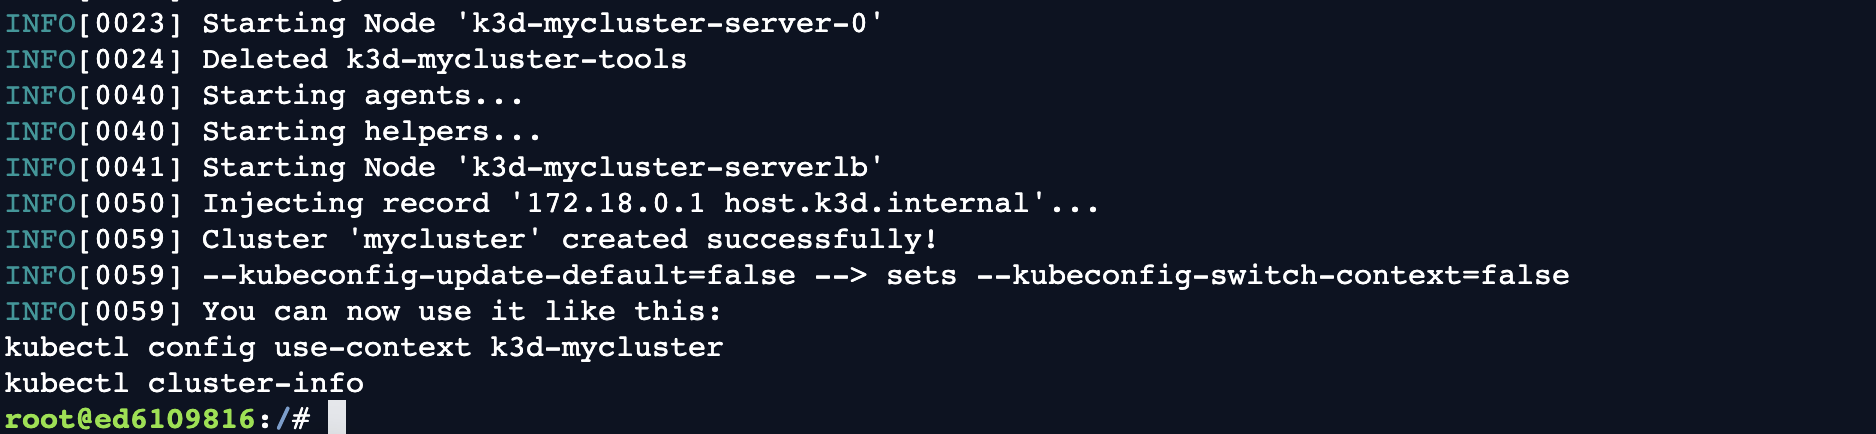
创建一个 Cluster
k3d cluster create mycluster
kubectl get nodes


组件
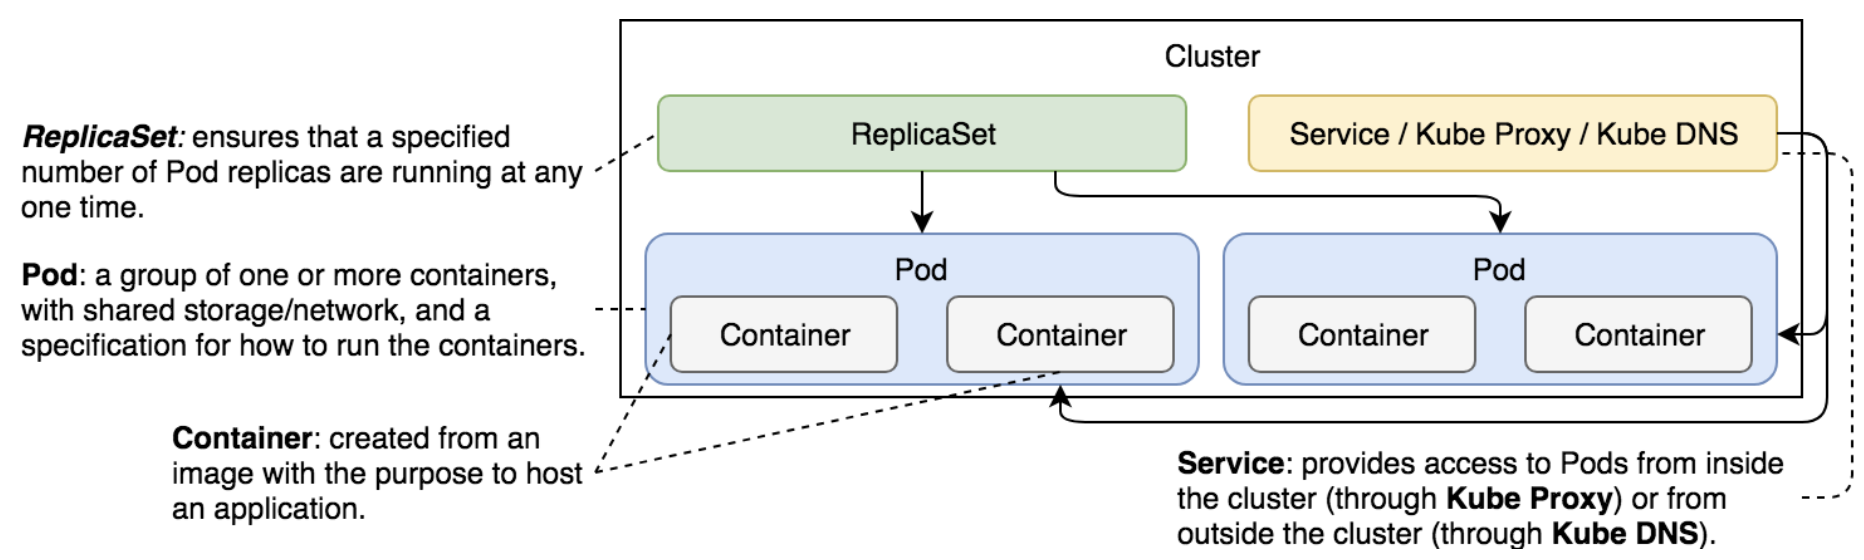
Pods
定义
- 最小单位,拥有独立的网络 IP,存储。
apiVersion: v1
kind: Pod
metadata:
	name: db
	labels:
		type: db
		vendor: MongoLabs
spec:
	containers:
	- name: db
	  image: mongo:3.3
	  command: ["mongod"]
	  args: ["--reset", "--httpinterface"]
实践
kubectl run db --image mongo
kubectl create -f db.yml
kubectl get pods -o wide
kubectl get pods -o json
kubectl get pods -o yaml
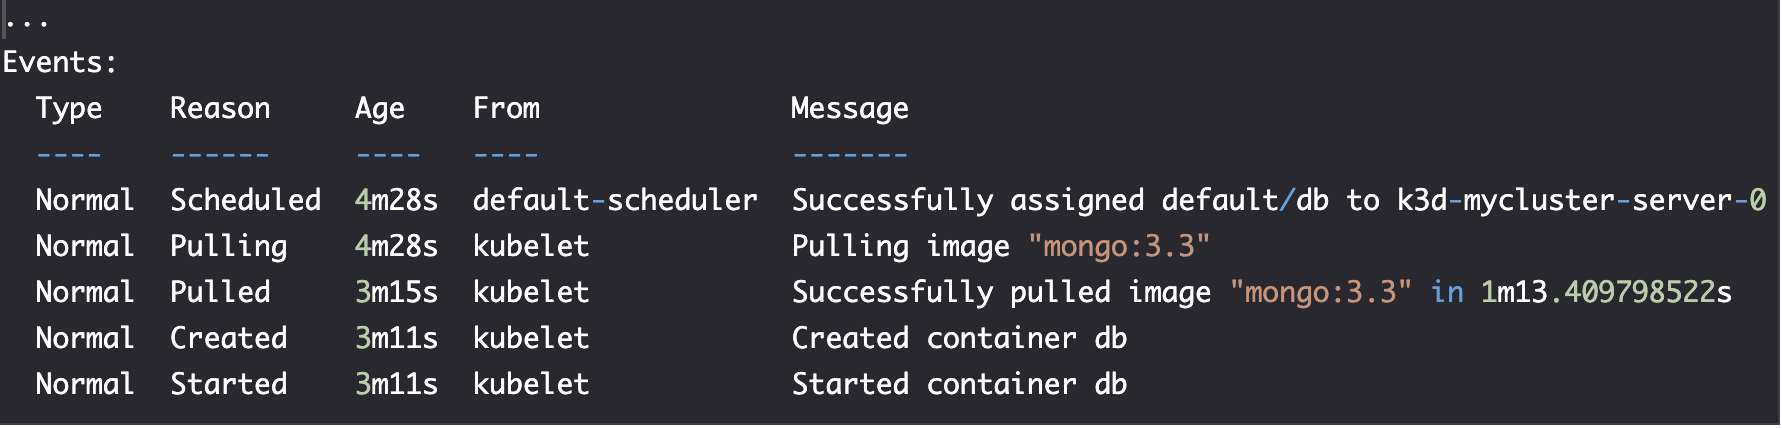
kubectl describe pod db
kubectl exec db -- ps aux
kubectl exec -c <container_name> db -- ps aux
kubectl exec -it db -- sh # -i stdin -t terminal

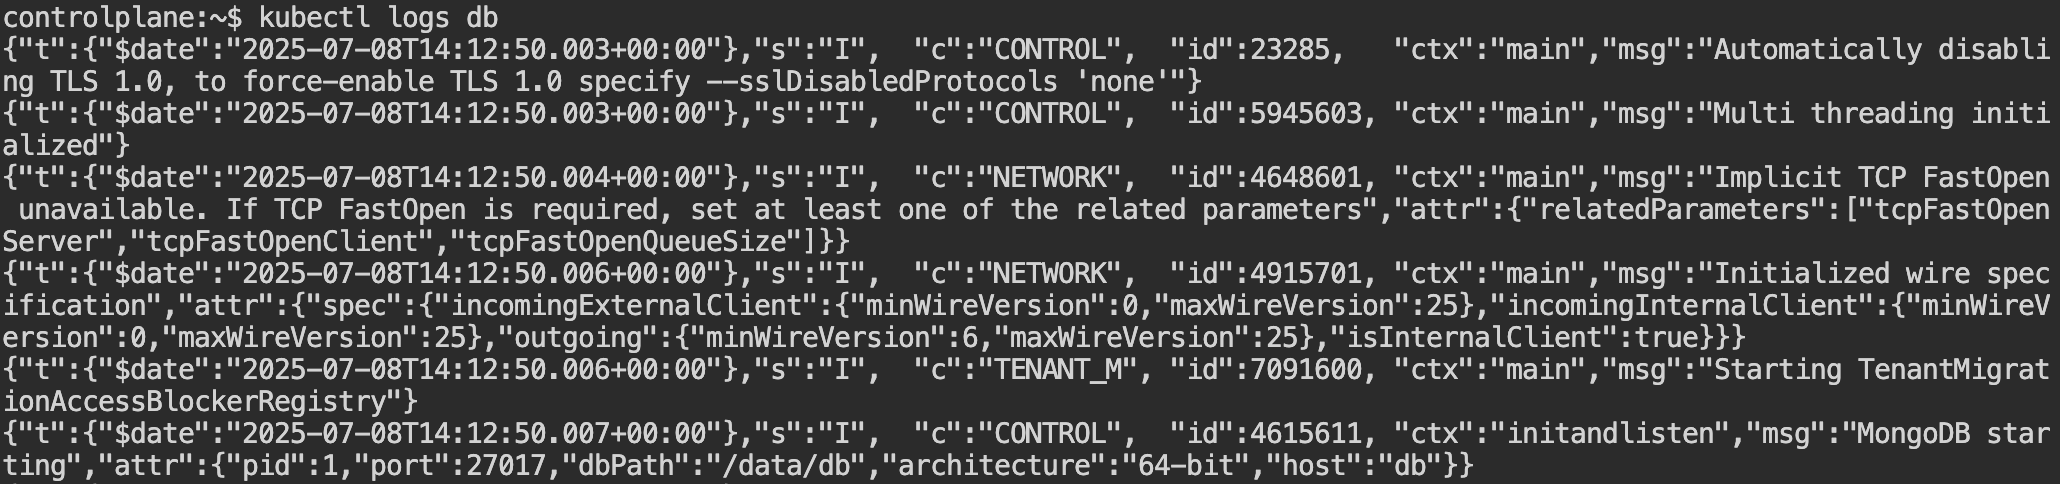
kubectrl logs db
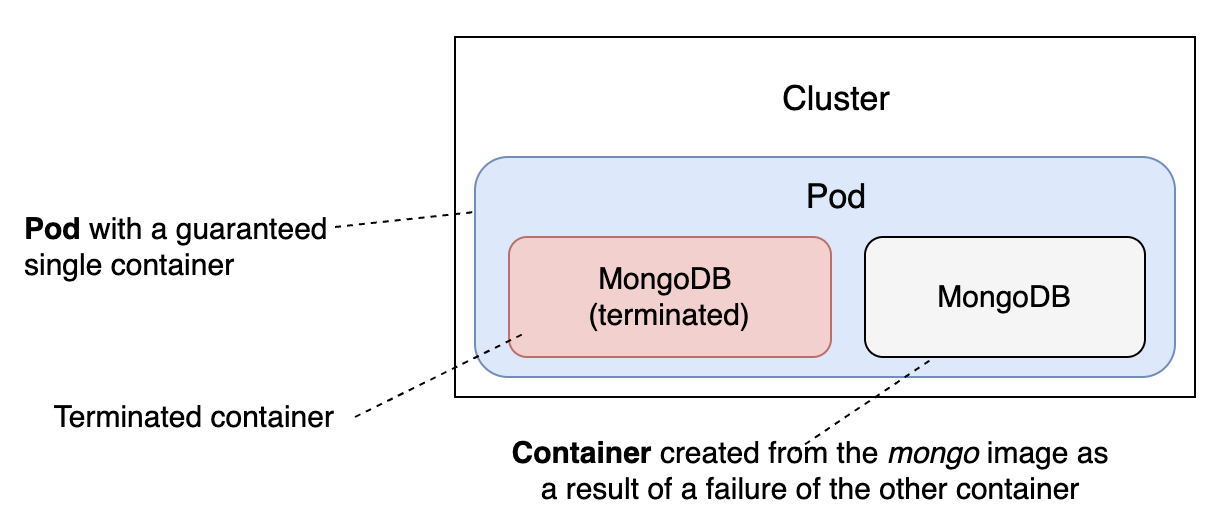
Pod 中的 mongoDB continer 将被保证至少运行一个,kube run db --image mongo 中自带 RESTARTS=1。
kubectl delete -f db.yml
kubectl delete pod db
当我们发送删除 Pod 的指令时,Kubernetes 会尝试优雅地终止它。
- 首先,它会向组成 Pod 的所有容器内的主进程发送 TERM(终止)信号。
- 随后,Kubernetes 为每个容器提供 30 秒的时间,以便这些容器中的进程可以正常关闭。
- 一旦宽限期结束,KILL 信号将被发送,强制终止所有主进程,并随之终止所有容器。默认的宽限期可以通过 YAML 定义中的
gracePeriodSeconds值或kubectl delete命令的--grace-period参数进行修改。
Pod 中可以有多个运行容器。
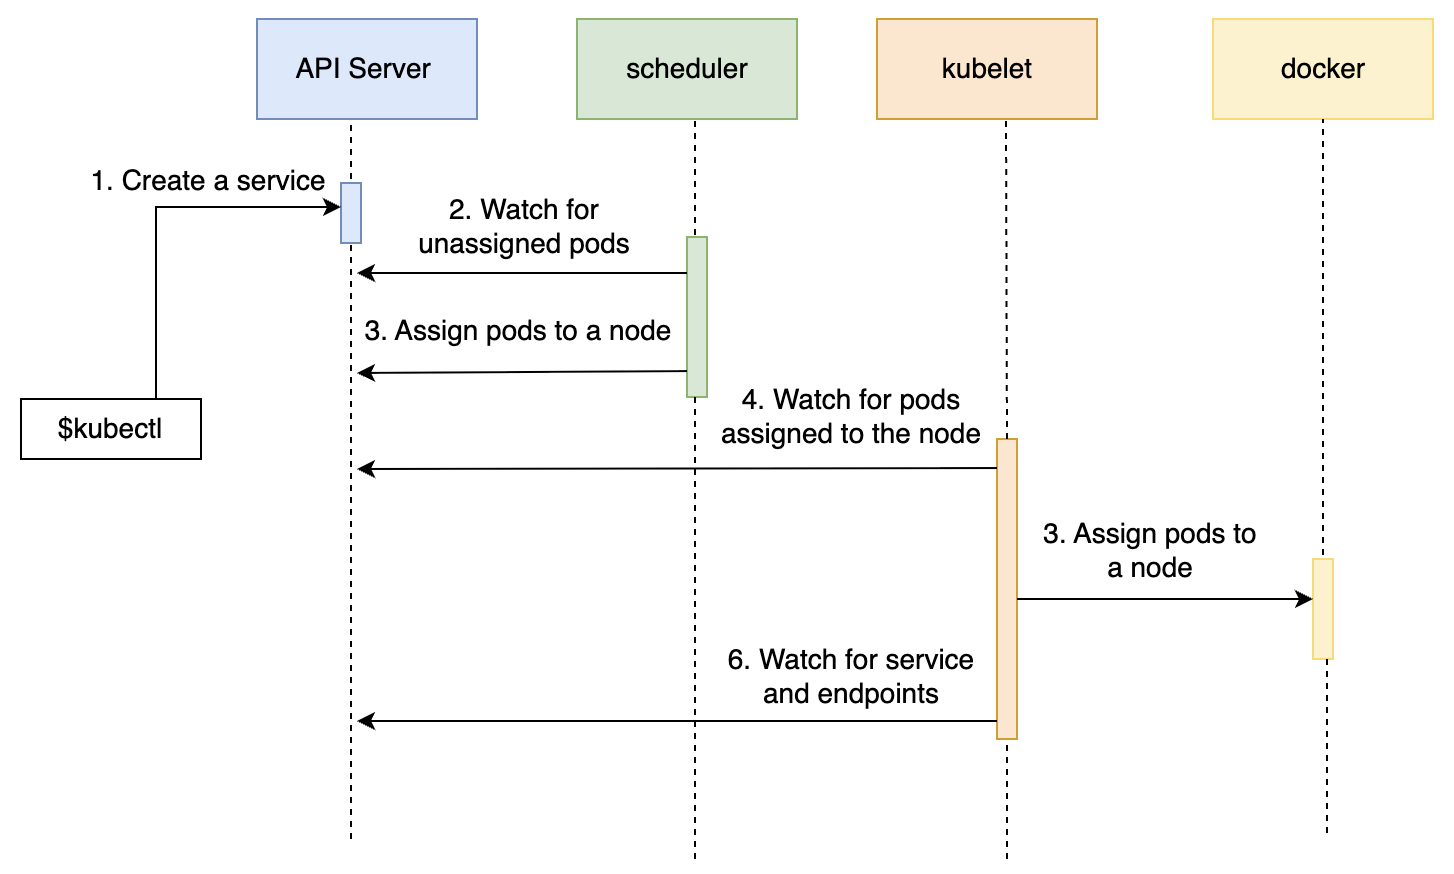
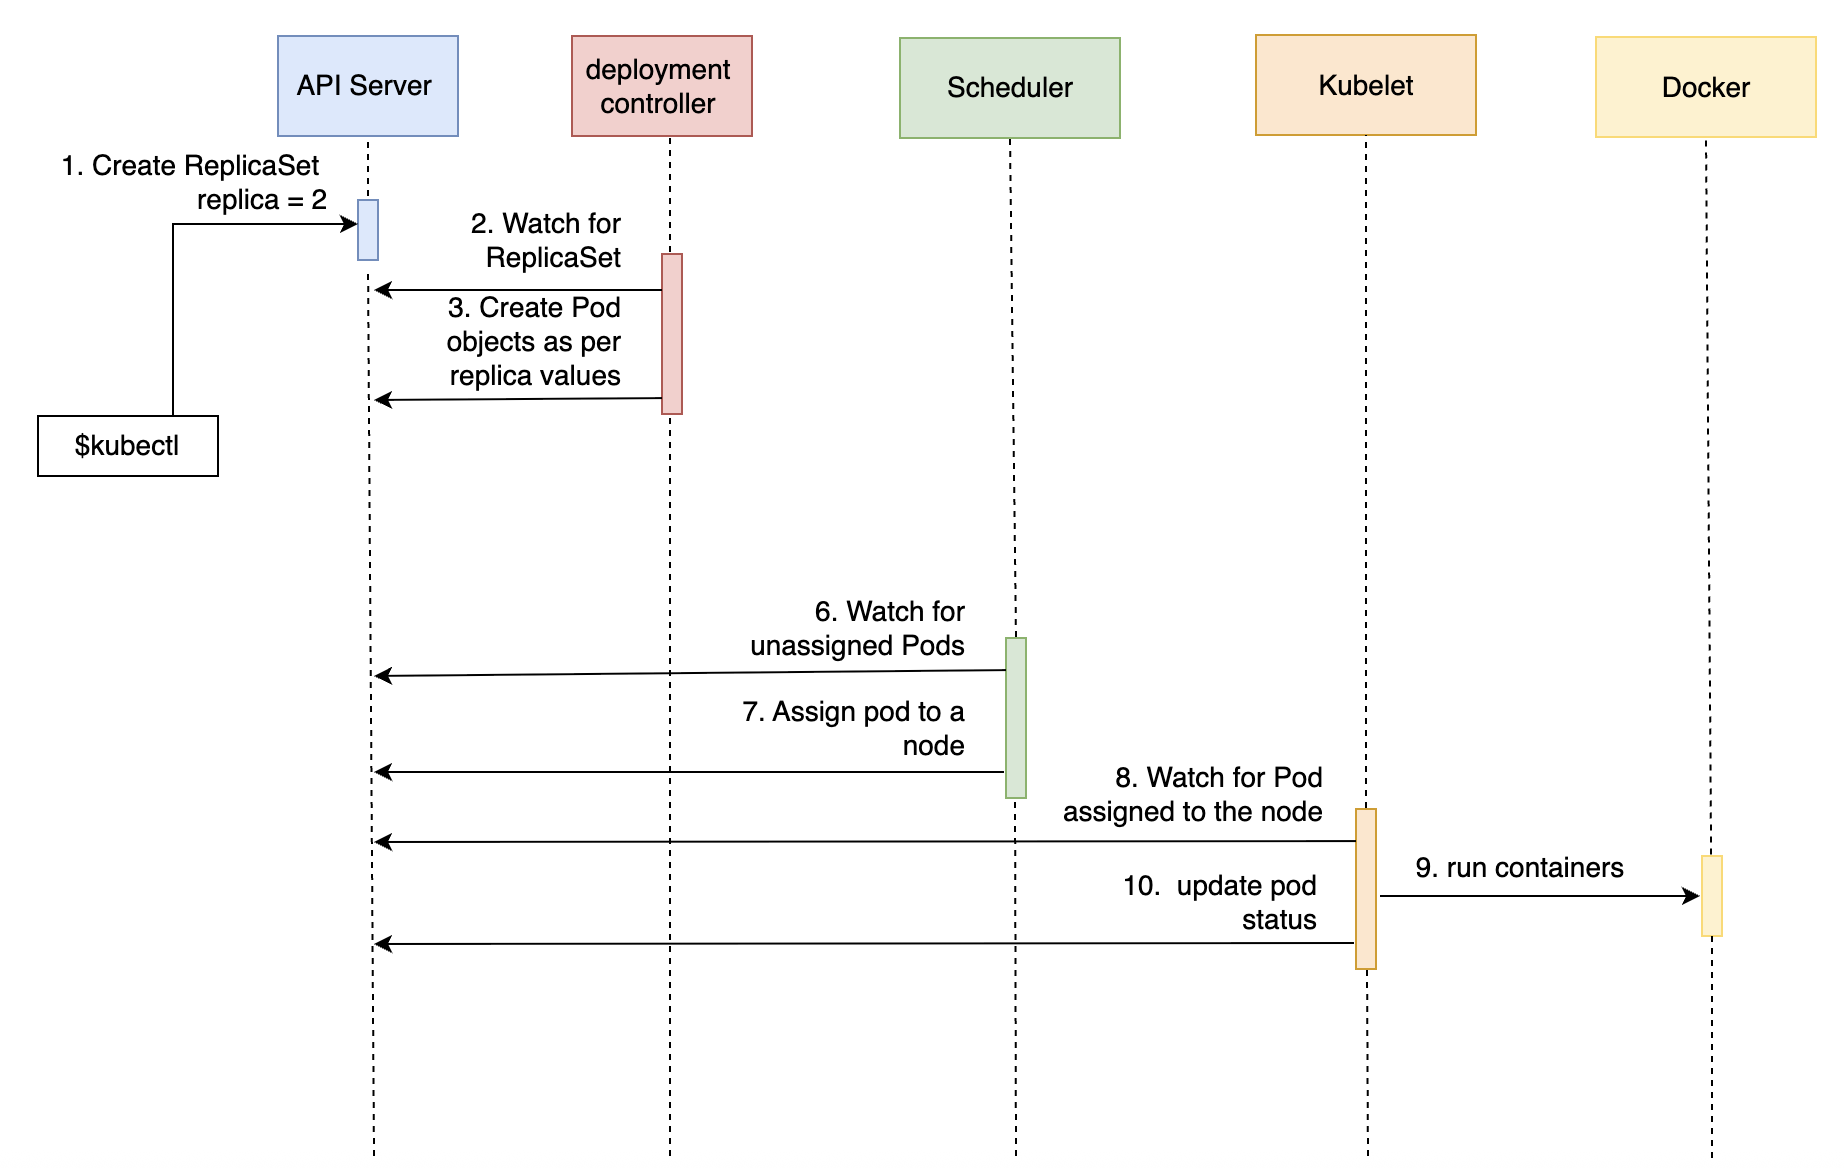
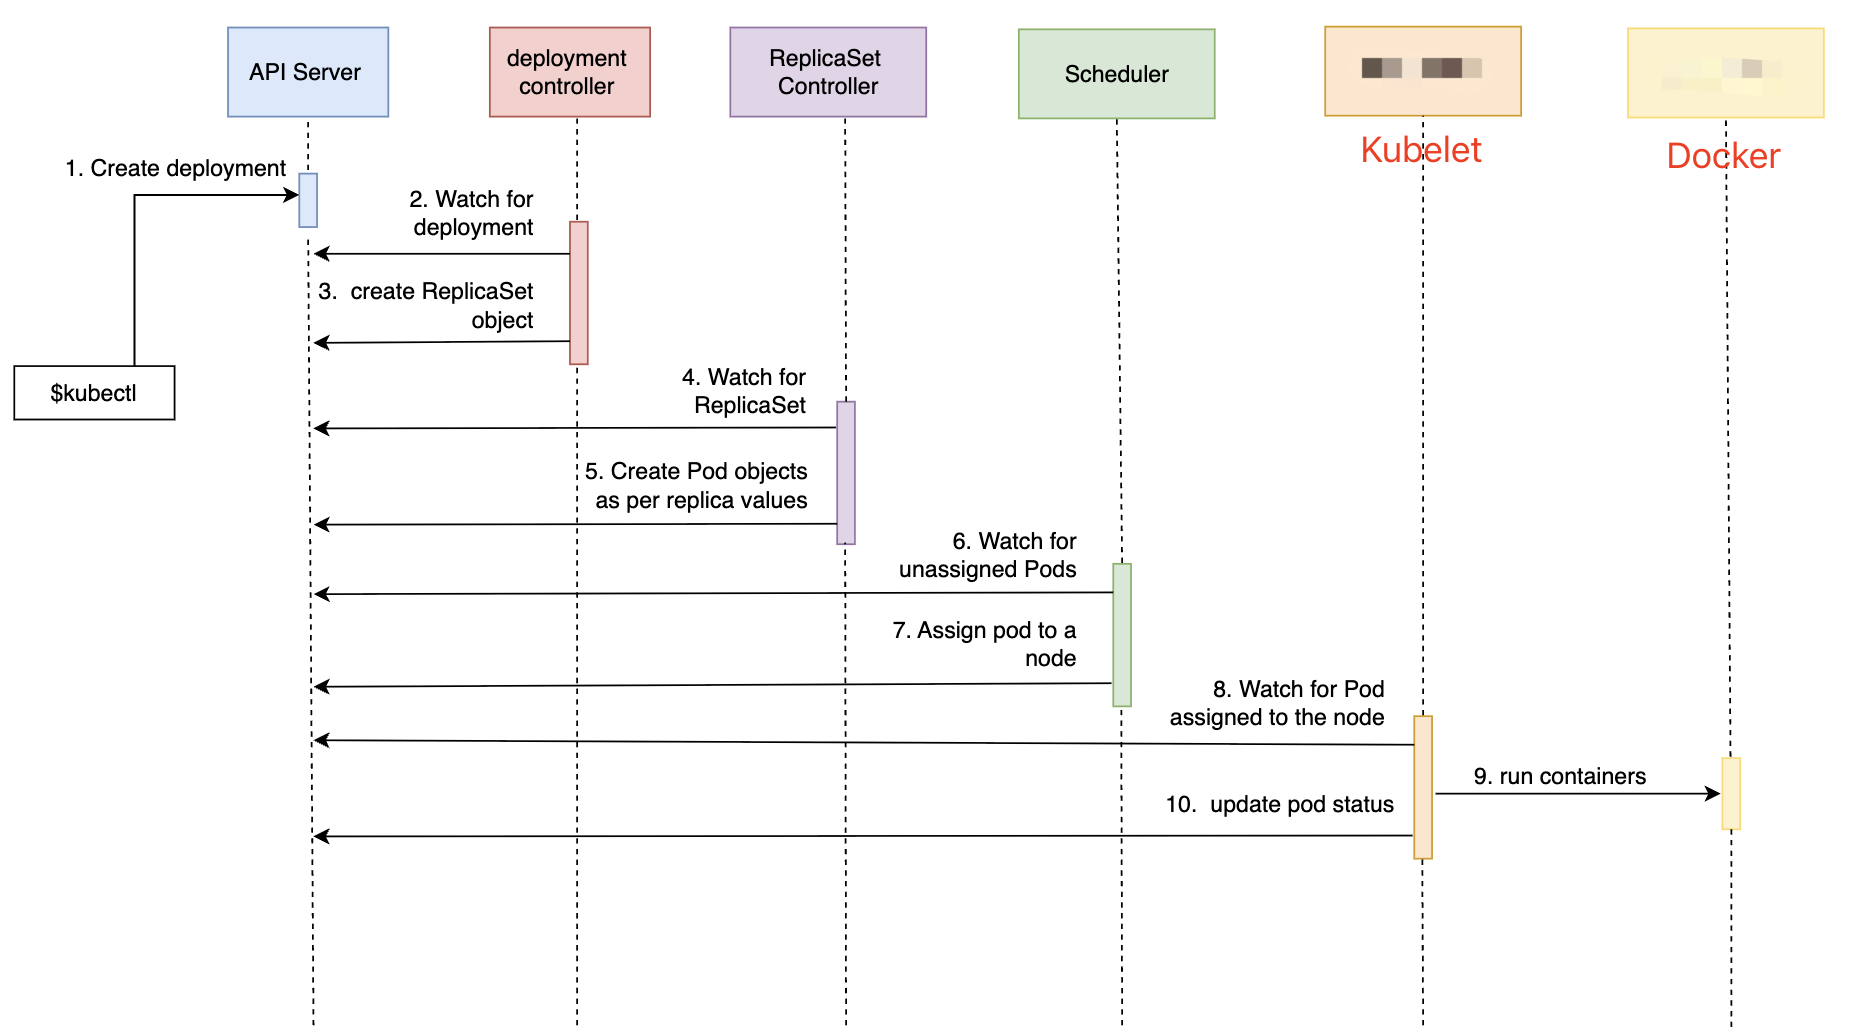
结构流程
- API server: 负责所有 API calls,基本上它会与 kubernetes 上所有其他组件交互。
- Scheduler: 调度未分配的 Pod 到合适主机。
- Kubelet: 确保被分配到的 Pod 运行,从 Master 获得 Pod 定义,pull image, 使用 Docker (Running time, 或其他运行时)启动 Pod。
监控运行状况
Liveness probe
- 目的:检测容器是否仍在正常运行
- 行为:当检查失败时,kubelet 会杀死并重启容器
- 影响:触发容器重启 (默认为
Always的重启策略)
Readiness probe
- 目的:检测 Pod 是否已准备好接收流量
- 行为:当检查失败时,从 Service 的 Endpoints 中移除该 Pod
- 影响:不重启容器,只影响流量路由
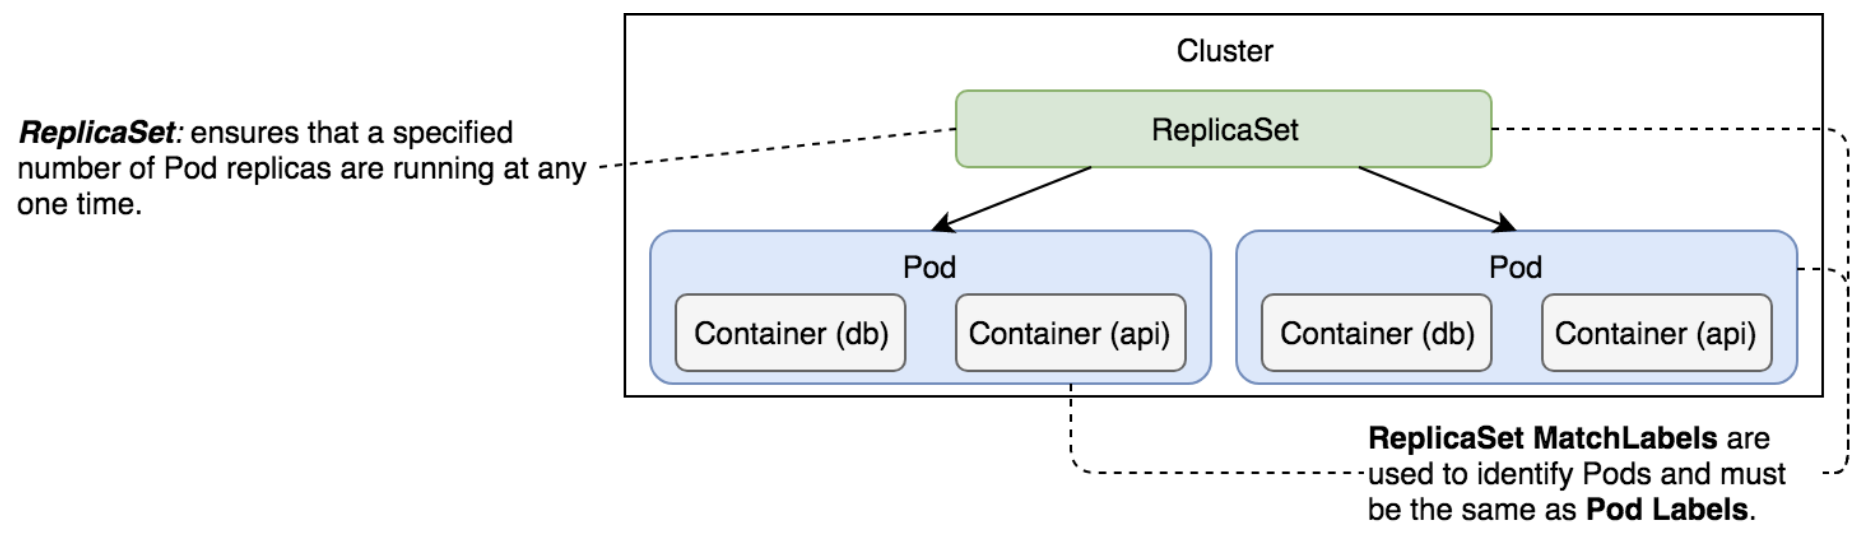
ReplicaSets
定义
保证 Pod 的运行数量与生命状态一致: ReplicaSet’s primary function is to ensure that the specified number of replicas of service are (almost) always running.
ReplicationController 已经标记 弃用 Deprecated。
apiVersion: apps/v1
kind: ReplicaSet
metadata:
	name: go-demo-2
sepc:
	replicas: 2
	selector:
		matchLabels:
			type: backend
			service: go-demo-2
	template:
		metadata:
			labels:
				type: backend
				service:go-demo-2
				db: mongo
				language: go
		spec:
			containers:
			- name: db
			  image: mongo:3.3
			- name: api
			  image: vfarcic/go-demo-2
			  env:
			  - name: DB
			    value: localhost
			  livenessProbe:
				  httpGet:
					  path: /demo/hello
					  port: 8080
实践
kubectl create -f go-demo-2.yml
kubectl apply -f go-demo-2.yml

kubectl get rs

kubectl get -f go-demo-2.yml
kubectl describe -f go-demo-2.yml

kubectl get pods --show-labels

删除 pod
POD_NAME=$(kubectl get pods -o name \
	| tail -1)
kubectl delete $POD_NAM

删除 pod label
POD_NAME=$(kubectl get pods -o name \
    | tail -1)
kubectl label $POD_NAME service-
# kubectl label $POD_NAME service=go-demo-2
kubectl describe $POD_NAME

kubectl get pods --show-labels

删除 ReplicaSets
kubectl delete -f go-demo-2.yml --cascade=true
kubectl delete -f go-demo-2.yml --cascade=false # 不删除监视的 pods
结构流程

Pod, ReplicaSets

Services
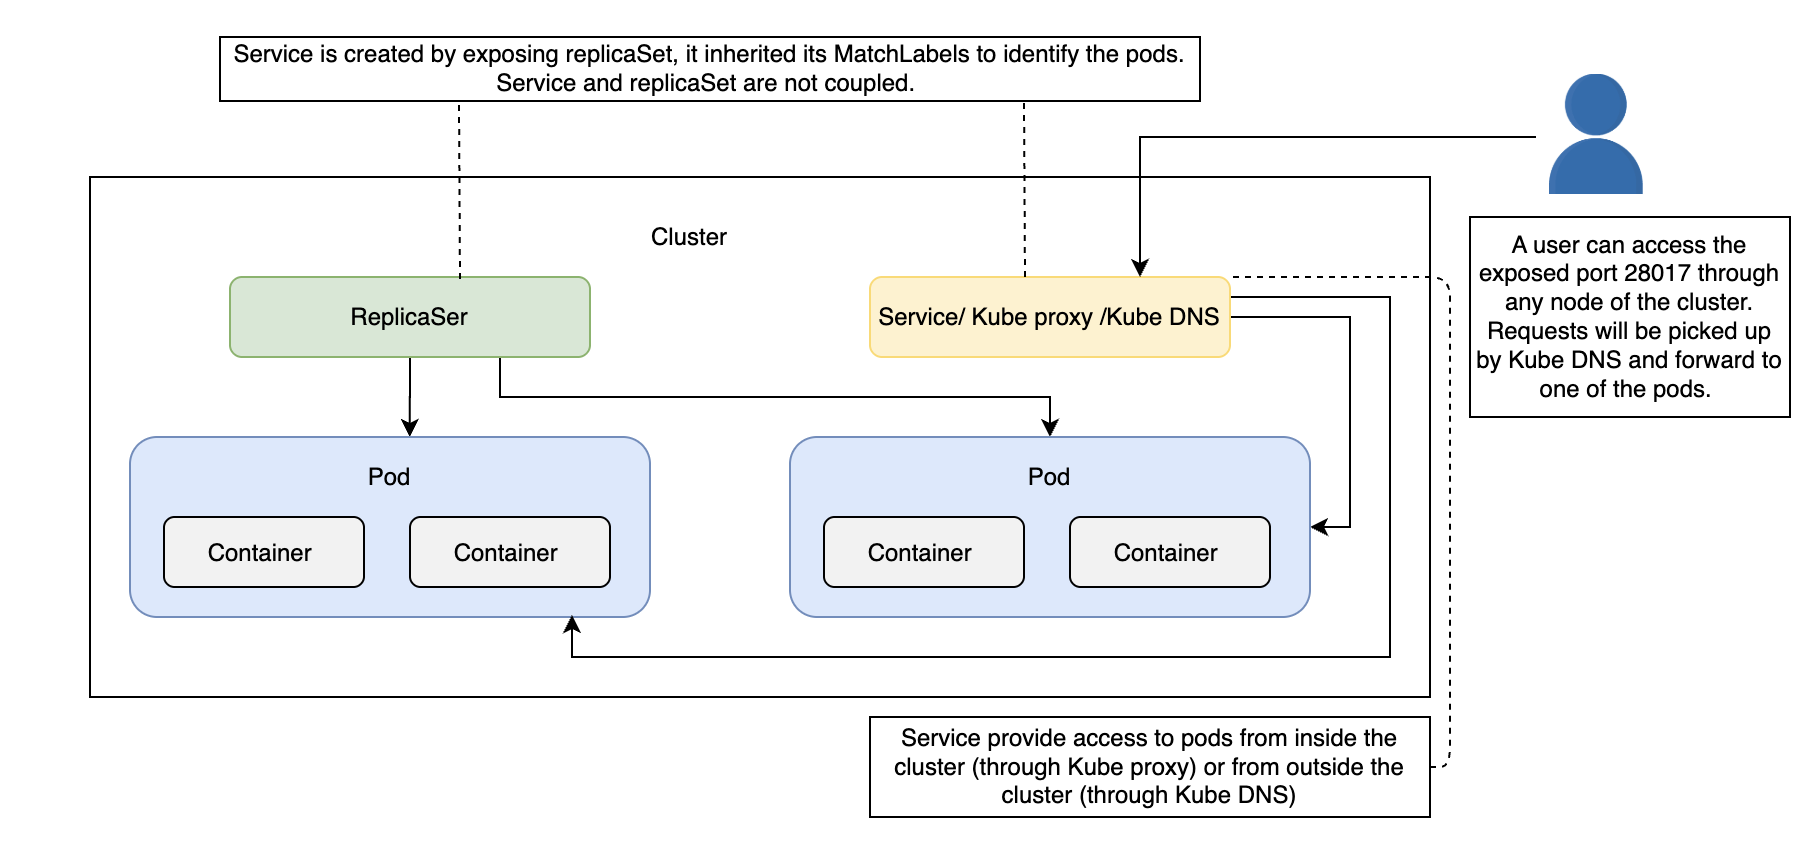
定义
与 kubectl expose 指令配合。
apiVersion: apps/v1
kind: ReplicaSet
metadata:
	name: go-demo-2
sepc:
	replicas: 2
	selector:
		matchLabels:
			type: backend
			service: go-demo-2
	template:
		metadata:
			labels:
				type: backend
				service:go-demo-2
				db: mongo
				language: go
		spec:
			containers:
			- name: db
			  image: mongo:3.3
			  command: ["mongod"]
			  args: ["--reset", "--httpinterface"]
			  ports:
			  - containerPort: 28017
			    portocal: TCP
			- name: api
			  image: vfarcic/go-demo-2
			  env:
			  - name: DB
			    value: localhost
			  livenessProbe:
				  httpGet:
					  path: /demo/hello
					  port: 8080
通过 yaml 文件创建。
apiVersion: v1
kind: Service
metadata:
	name: go-demo-2
spec:
	type: NodePort
	ports:
	- port: 28017
	  nodePort: 30001
	  protocol: TCP
	  # protocol: UDP
	selector:
		type: backend
		service: go-demo-2
类型
- NodePort: 节点端口可以访问
- ClusterIP: 集群内部可访问
- LoadBalancer: 与云提供商的负载均衡器结合使用
- ExternalName(用途有限): 将 Service 映射到外部地址, 如 kubernetes.io
实践
kubectl create -f go-demo-2-rs.yml
kubectl get -f go-demo-2-rs.yml
# Create service by expose command quickly
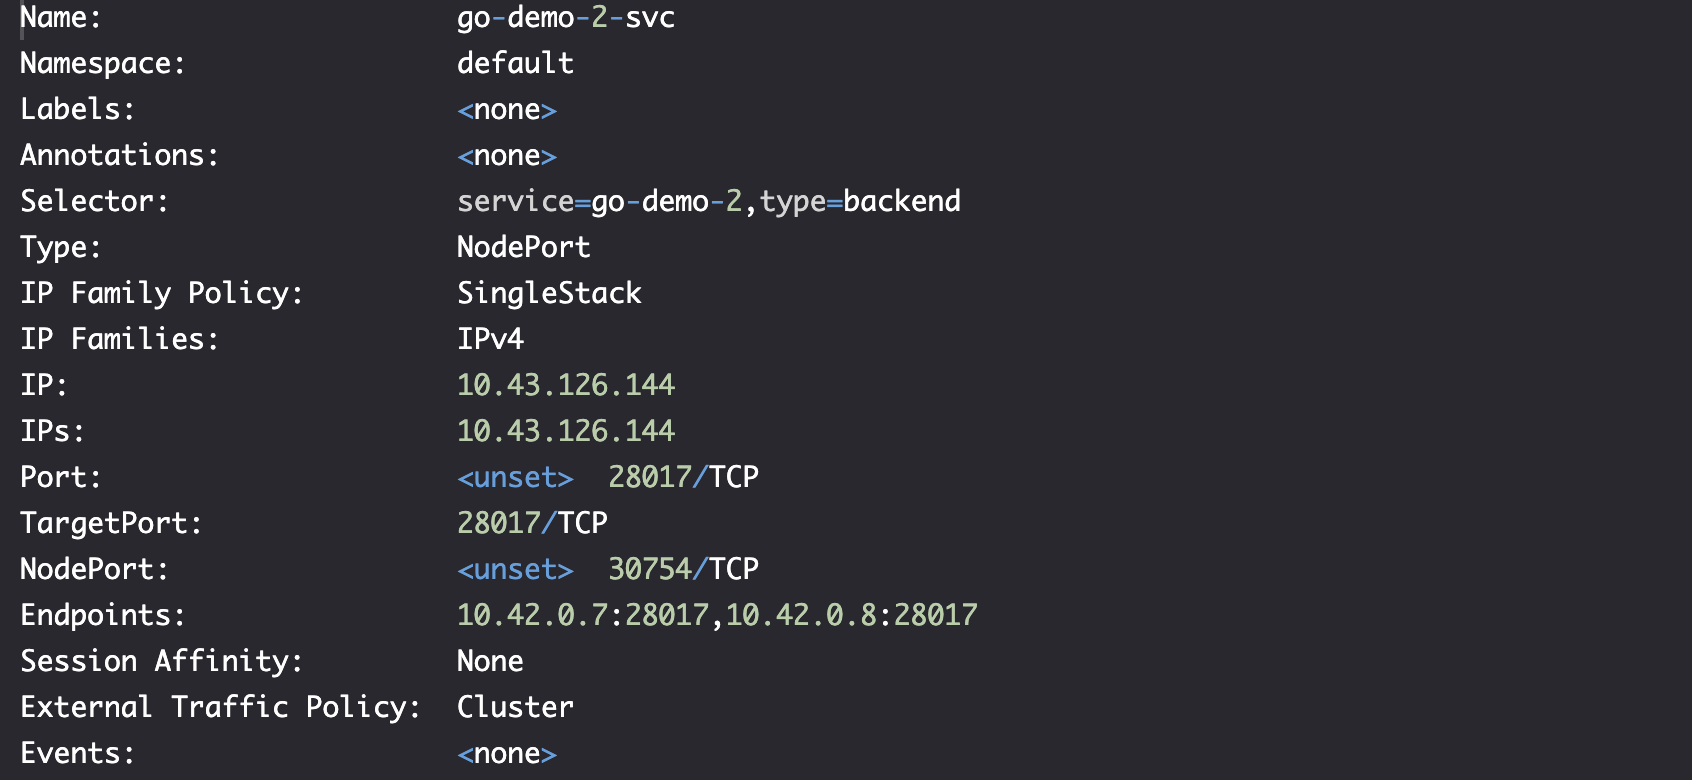
kubectl expose rs go-demo-2 \
--name=go-demo-2-svc \
--target-port=28017 \
--type=NodePort
kubectl describe svc/go-demo-2-svc
流量转发
kubectl port-forward service/go-demo-2-svc 3000:28017 --address 0.0.0.0
- Kube proxy 从内部转发流量
- Kube DNS 从外部转发流量
kubectl port-forward service/go-demo-2 3000:28017 --address 0.0.0.0
# kubectl port-forward: 流量转发指令
# service/go-demo-2: 服务名称
# `3000:28017`: 将本地的 3000 端口映射到 Service 的 28017 端口
# --address 0.0.0.0: 默认情况下,port-forward 仅绑定到 127.0.0.1(本地回环地址),只能通过本机访问。此参数将监听地址改为 0.0.0.0,允许其他机器通过你的本地 IP 访问转发的服务(例如从局域网或公网访问)。
Delete service
kubectl delete svc go-demo-2-svc
结构流程
Services 服务拆分
四个文件
kubectl apply -f go-demo-2-db-rs.yml
kubectl apply -f go-demo-2-db-svc.yml
kubectl apply -f go-demo-2-api-rs.yml
kubectl apply -f go-demo-2-api-svc.yml
api 服务新增 livenessProbe
livenessProbe:
  httpGet:
    path: /demo/hello
    port: 8080
kubctl get all
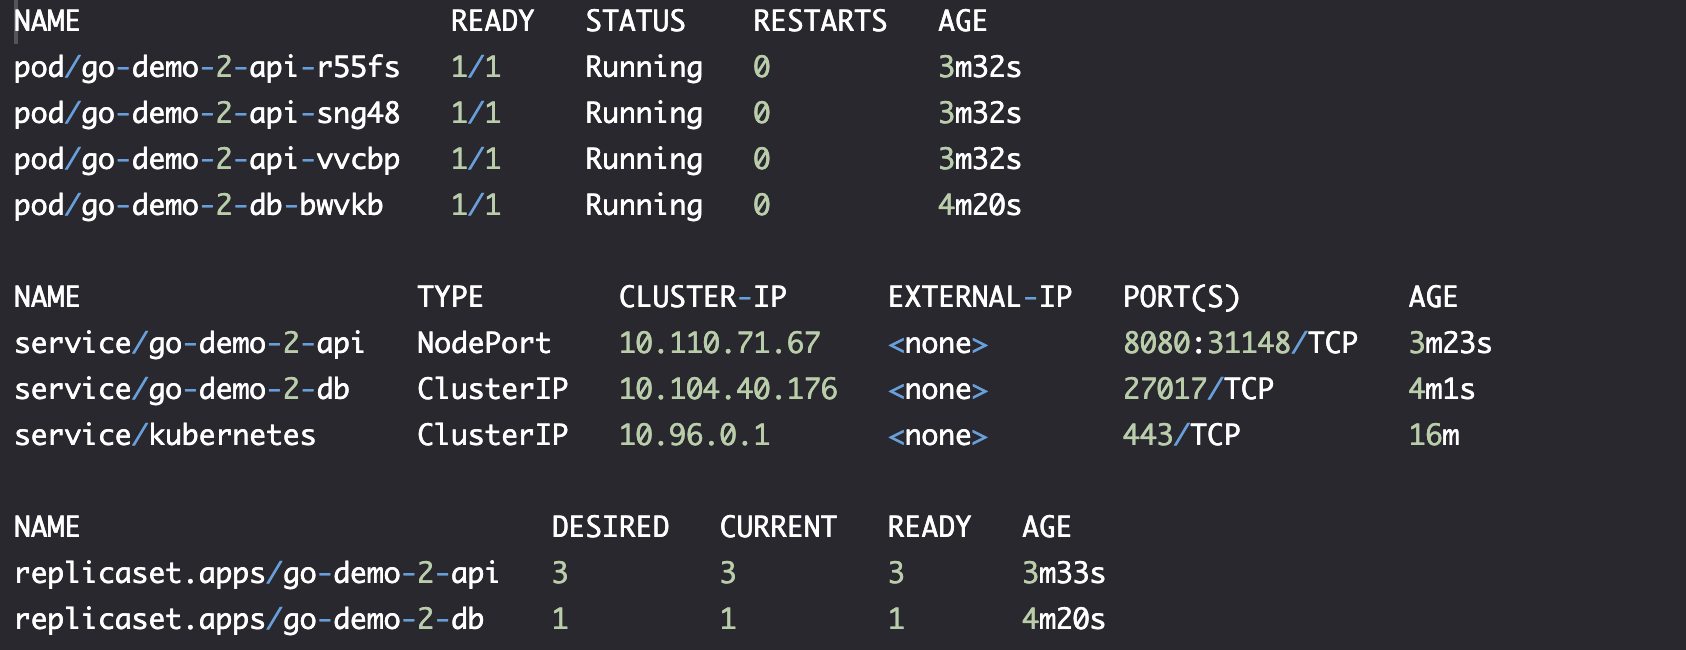
nohup kubectl port-forward service/go-demo-2-api --address 0.0.0.0  3000:8080 > /dev/null 2>&1 &
# 流量从本地 3000 端口转发到 Service/go-demo-2-api 8080 端口

curl -i "http://localhost:3000/demo/hello"

删除所有资源
kubectl delete -f go-demo-2-db-rs.yml
kubectl delete -f go-demo-2-db-svc.yml
kubectl delete -f go-demo-2-api-rs.yml
kubectl delete -f go-demo-2-api-svc.yml
你可以通过 --- 将所有文件合并
apiVersion: apps/v1
kind: ReplicaSet
metadata:
  name: go-demo-2-db
spec:
  selector:
    matchLabels:
      type: db
      service: go-demo-2
  template:
    metadata:
      labels:
        type: db
        service: go-demo-2
        vendor: MongoLabs
    spec:
      containers:
        - name: db
          image: mongo:3.3
          ports:
            - containerPort: 28017

---
apiVersion: v1
kind: Service
metadata:
  name: go-demo-2-db
spec:
  ports:
    - port: 27017
  selector:
    type: db
    service: go-demo-2

---
apiVersion: apps/v1
kind: ReplicaSet
metadata:
  name: go-demo-2-api
spec:
  replicas: 3
  selector:
    matchLabels:
      type: api
      service: go-demo-2
  template:
    metadata:
      labels:
        type: api
        service: go-demo-2
        language: go
    spec:
      containers:
        - name: api
          image: vfarcic/go-demo-2
          env:
            - name: DB
              value: go-demo-2-db
          readinessProbe:
            httpGet:
              path: /demo/hello
              port: 8080
            periodSeconds: 1
          livenessProbe:
            httpGet:
              path: /demo/hello
              port: 8080

---
apiVersion: v1
kind: Service
metadata:
  name: go-demo-2-api
spec:
  type: NodePort
  ports:
    - port: 8080
  selector:
    type: api
    service: go-demo-2
Services 服务发现
- Environment variables 环境变量
- DNS DNS 解析
获取 go-demo-2-db 的环境变量
POD_NAME=$(kubectl get pod \
    --no-headers \
    -o=custom-columns=NAME:.metadata.name \
    -l type=db,service=go-demo-2 \
    | tail -1)

kubectl exec $POD_NAME -- env
output
PATH=/usr/local/sbin:/usr/local/bin:/usr/sbin:/usr/bin:/sbin:/bin
HOSTNAME=go-demo-2-db-dgbqg
GOSU_VERSION=1.7
MONGO_MAJOR=3.3
MONGO_VERSION=3.3.15
MONGO_PACKAGE=mongodb-org-unstable
KUBERNETES_PORT=tcp://10.43.0.1:443
GO_DEMO_2_DB_PORT_27017_TCP_PORT=27017
GO_DEMO_2_DB_PORT_27017_TCP_ADDR=10.43.223.206
GO_DEMO_2_API_PORT_8080_TCP=tcp://10.43.54.204:8080
GO_DEMO_2_API_PORT_8080_TCP_PORT=8080
GO_DEMO_2_API_PORT_8080_TCP_ADDR=10.43.54.204
KUBERNETES_SERVICE_PORT_HTTPS=443
KUBERNETES_PORT_443_TCP_PORT=443
KUBERNETES_PORT_443_TCP_ADDR=10.43.0.1
GO_DEMO_2_API_SERVICE_HOST=10.43.54.204
GO_DEMO_2_API_PORT=tcp://10.43.54.204:8080
KUBERNETES_SERVICE_HOST=10.43.0.1
GO_DEMO_2_DB_SERVICE_HOST=10.43.223.206
GO_DEMO_2_DB_SERVICE_PORT=27017
GO_DEMO_2_DB_PORT=tcp://10.43.223.206:27017
GO_DEMO_2_DB_PORT_27017_TCP=tcp://10.43.223.206:27017
GO_DEMO_2_API_SERVICE_PORT=8080
KUBERNETES_SERVICE_PORT=443
KUBERNETES_PORT_443_TCP=tcp://10.43.0.1:443
KUBERNETES_PORT_443_TCP_PROTO=tcp
GO_DEMO_2_DB_PORT_27017_TCP_PROTO=tcp
GO_DEMO_2_API_PORT_8080_TCP_PROTO=tcp
HOME=/root
里面的 [SERVICE_NAME]_SERVICE_HOST, 还有其他变量 [SERVICE_NAME]_*:
KUBERNETES_SERVICE_HOST=10.43.0.1
GO_DEMO_2_API_SERVICE_HOST=10.43.54.204
GO_DEMO_2_DB_SERVICE_HOST=10.43.223.206
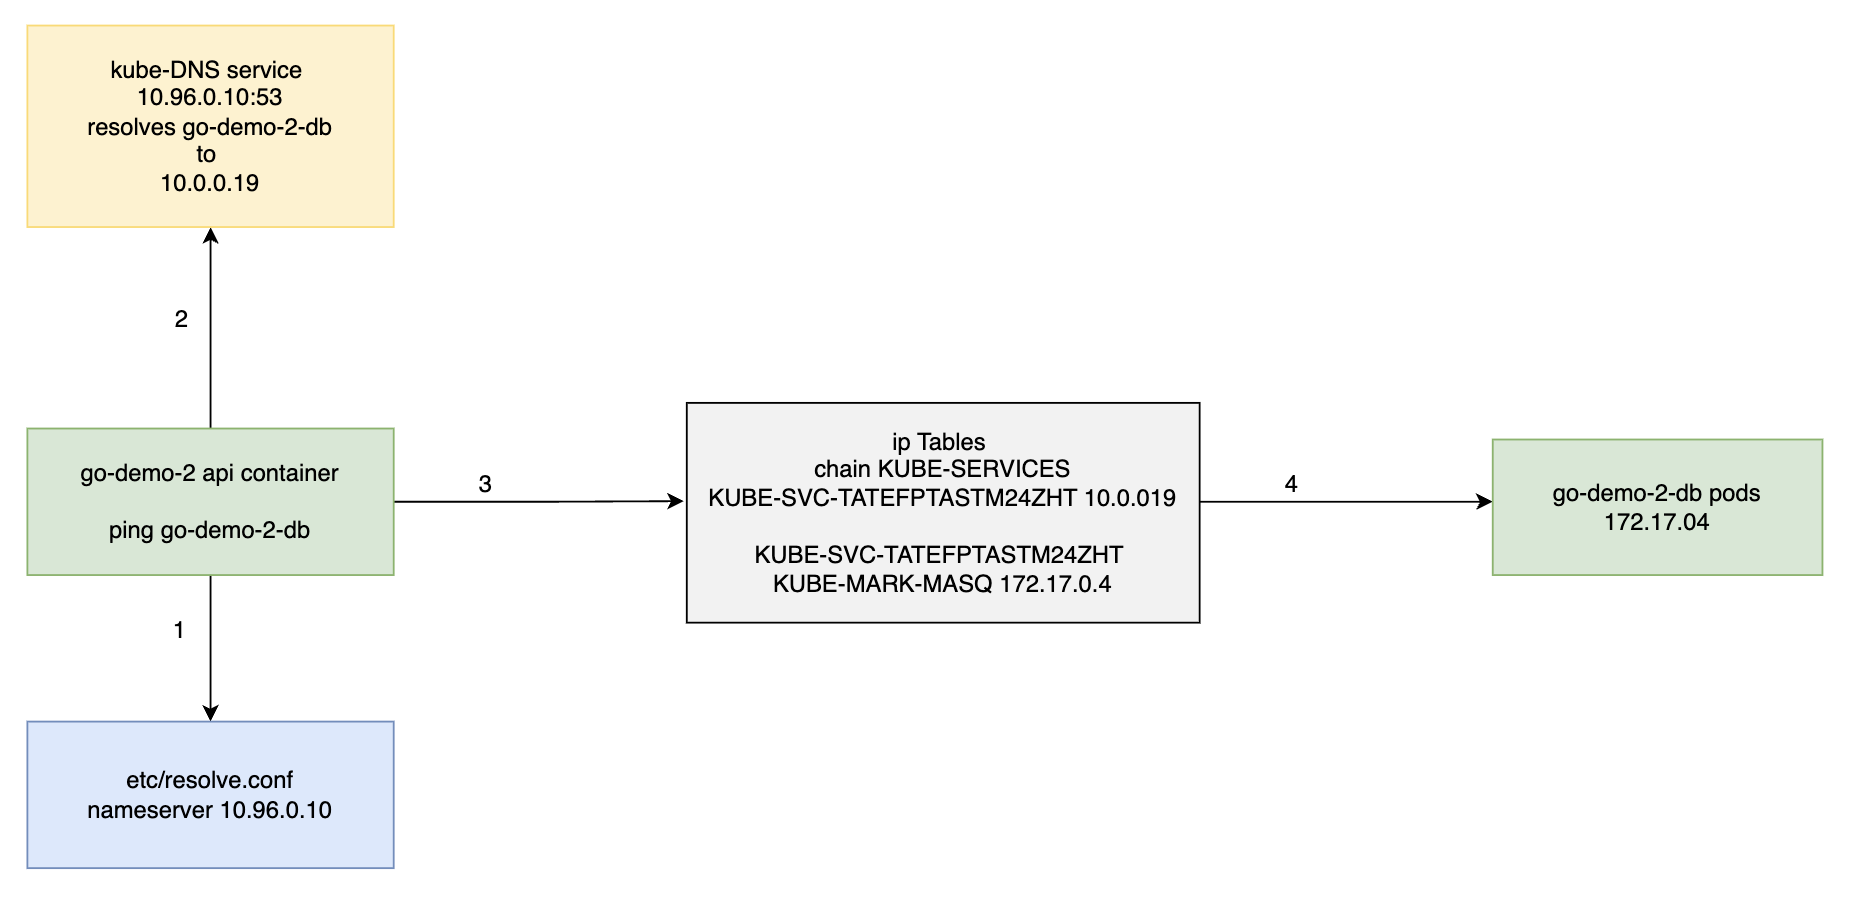
我们可以使用环境变量,但不方便,因为使用 DNS 会更容易。
在 go-demo-2-api-rs.yml 中
---
env:
  - name: DB
    value: go-demo-2-db
我们声明一个名为 Service (go-demo-2-db) 的环境变量。该变量被代码用作数据库的连接字符串。
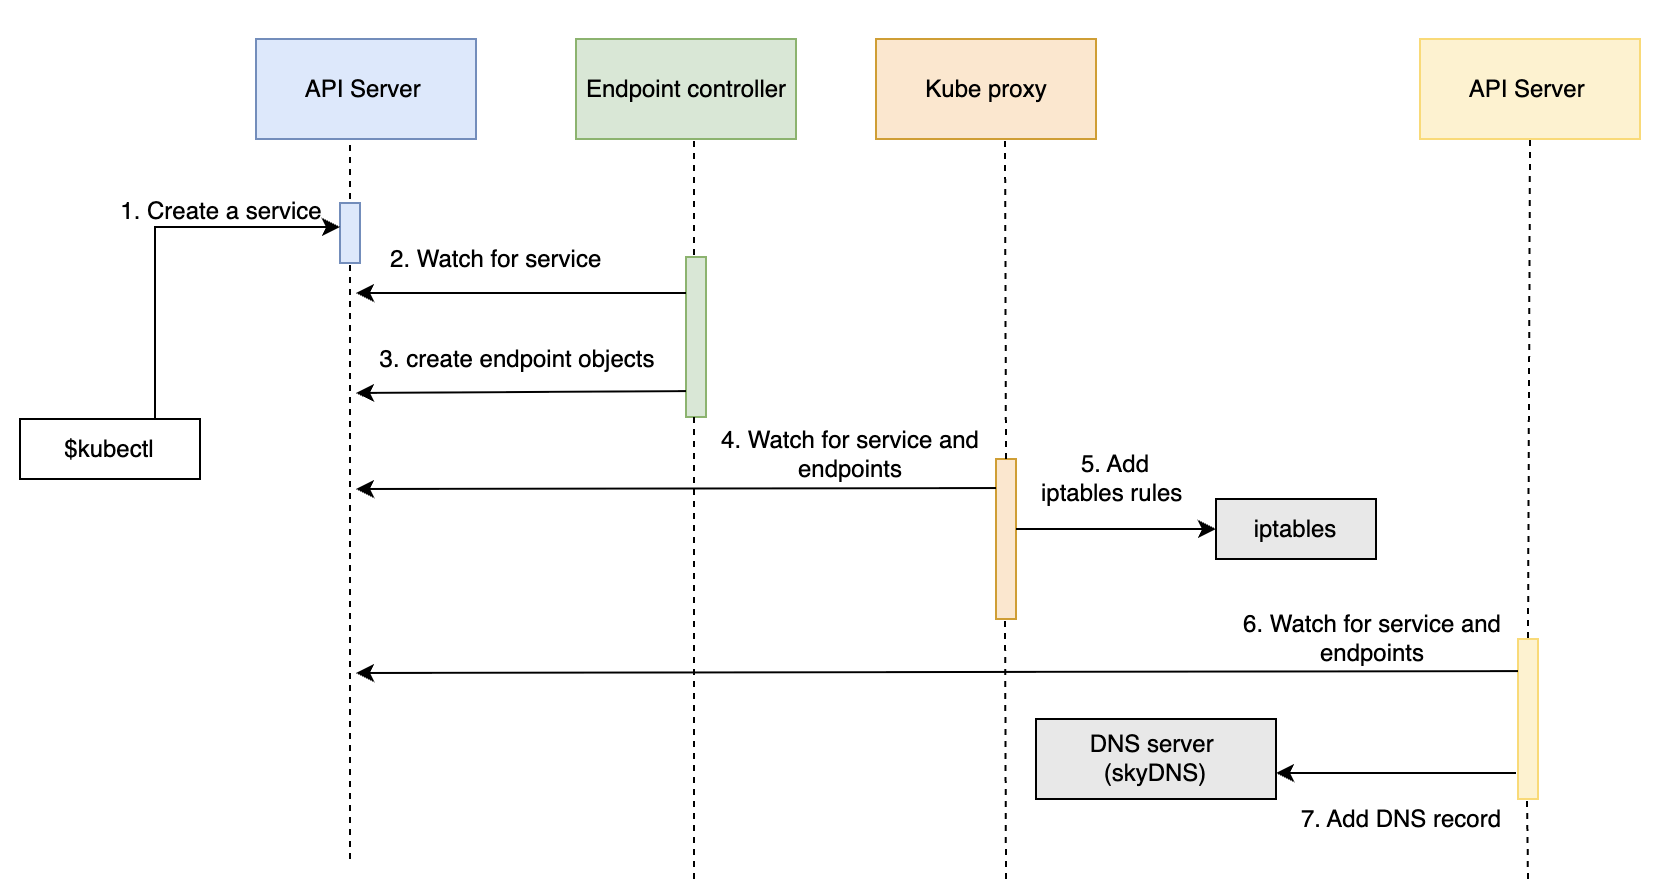
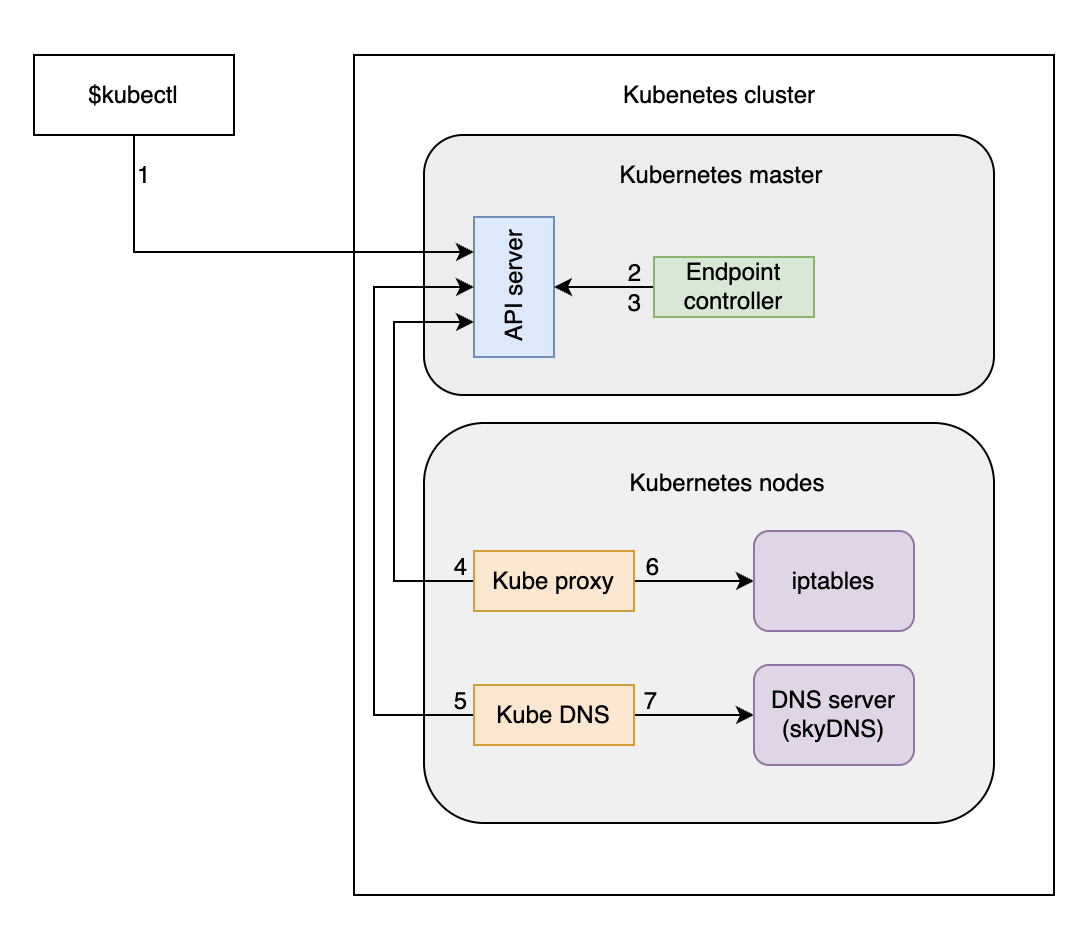
Kubernetes 将 Service 名称转换为 DNS 并将其添加到 DNS 服务器。
Deployments
结构流程
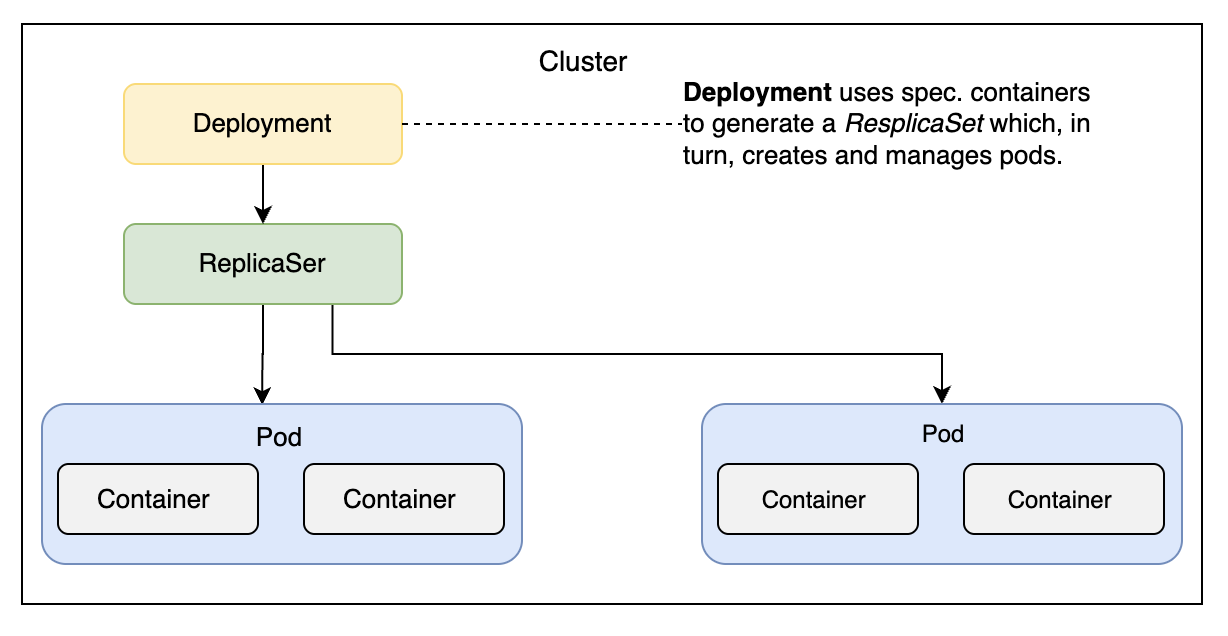
定义
zero downtime: 零停机时间,对用户体验的追求。
apiVersion: apps/v1
kind: Deployment
metadata:
	name: go-demo-2-db
spec:
	selector:
		metachLabels:
			type: db
			service: go-demo-2
	template:
		metadata:
			labels:
				type: db
				service: go-demo-2
				vendor: MongoLabs
		spec:
			containers:
			- name: db
			  image: mongo:3.3
			  ports:
			  - containerPort: 28017
相匹配的 Service 定义,用于测试
apiVersion: v1
kind: Service
metadata:
  name: go-demo-2-db
spec:
  ports:
    - port: 27017
  selector:
    type: db
    service: go-demo-2
指令
回滚
kubectl rollout status
kubectl rollout history
kubectl rollout undo
扩展部署
# 方法一: 临时紧急扩缩容调整, 如果不加 --record,将无版本记录
kubectl scale deployment go-demo-2-api --replicas 8 --record

# 方法二: 使用文件永久修改,有版本记录
kubectl apply -f go-demo-2.yml
实践
创建、查看
kubectl create \
    -f go-demo-2-db.yml \

kubectl get -f go-demo-2-db.yml

kubectl describe \
    -f go-demo-2-db.yml

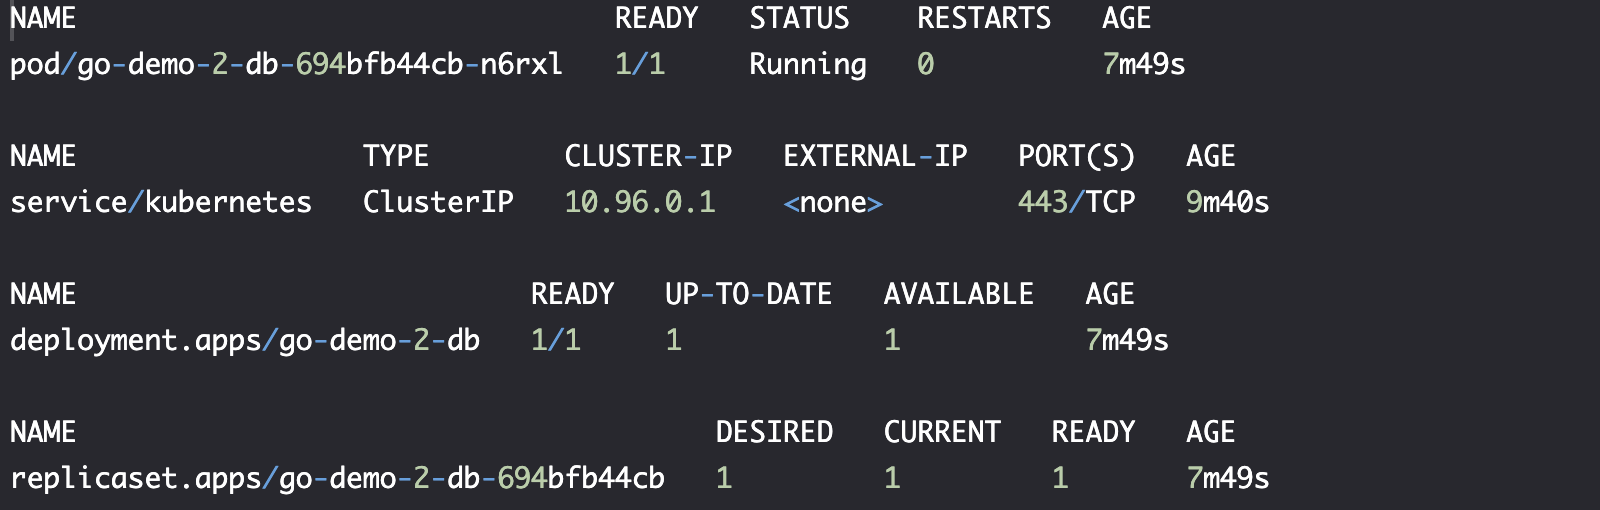
kubectl get all
更新部署
# 方法一: 直接更新 image
# 这个更新方法与能够方便地集成到 CI/CD 中
kubectl set image \
    -f go-demo-2-db.yml \
    db=mongo:3.4 \
    --record

kubectl edit -f go-demo-2-db.yml # 方法二: 手动修改配置

kubectl apply -f go-demo-2-db.yml# 方法三: 更新 yaml 文件后执行
--record: 定期将--record添加到kubectl命令中。这使我们能够跟踪对资源(例如 Deployments)的每次更改。
kubectl describe \
    -f go-demo-2-db.yml

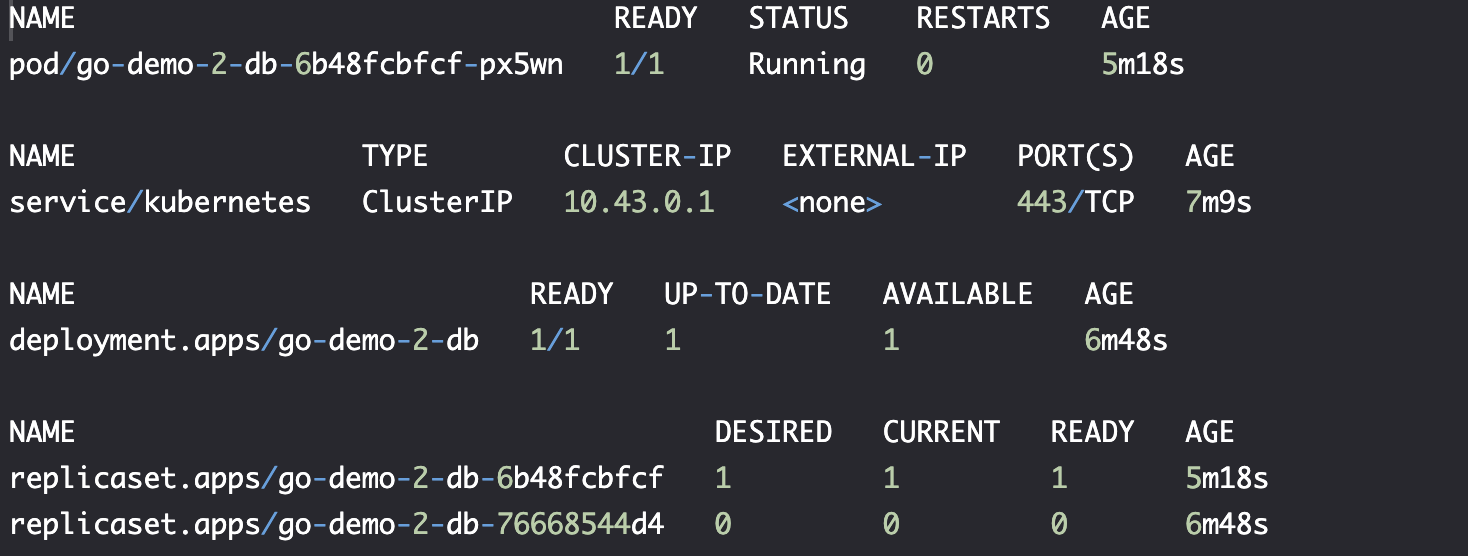
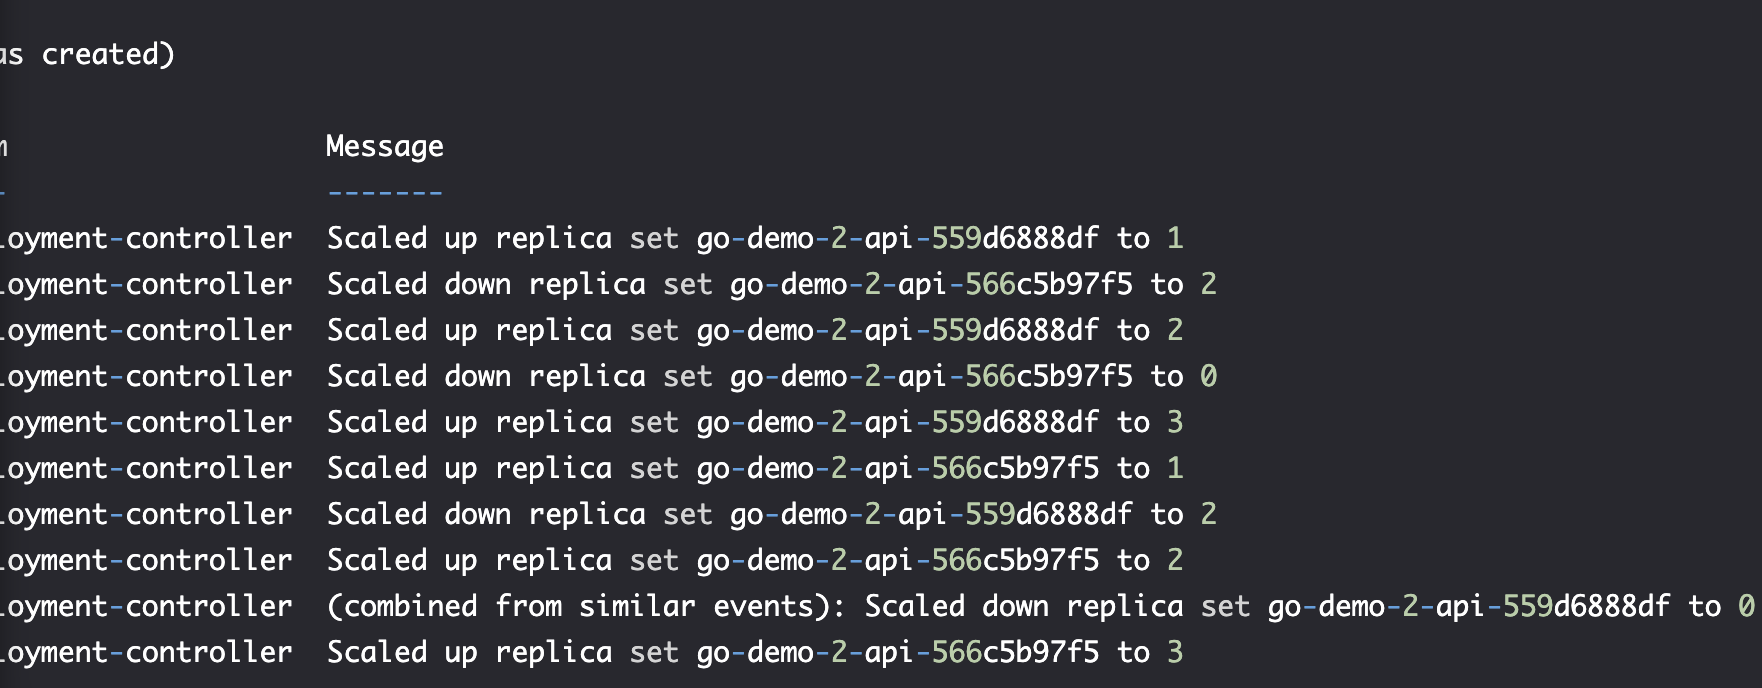
我们可以看到,它创建了一个新的 ReplicaSet 并将旧的 ReplicaSet 缩放为 0。
通过 Deployments,我们能决定部署策略。
kubectl get all
实践-多服务体现扩展性
Yaml 文件
apiVersion: apps/v1
kind: Deployment
metadata:
  name: go-demo-2-api
spec:
  replicas: 3
  selector:
    matchLabels:
      type: api
      service: go-demo-2
  minReadySeconds: 1
  progressDeadlineSeconds: 60
  revisionHistoryLimit: 5
  strategy:
    type: RollingUpdate
    rollingUpdate:
      maxSurge: 1
      maxUnavailable: 1
  template:
    metadata:
      labels:
        type: api
        service: go-demo-2
        language: go
    spec:
      containers:
        - name: api
          image: vfarcic/go-demo-2
          env:
            - name: DB
              value: go-demo-2-db
          readinessProbe:
            httpGet:
              path: /demo/hello
              port: 8080
            periodSeconds: 1
          livenessProbe:
            httpGet:
              path: /demo/hello
              port: 8080
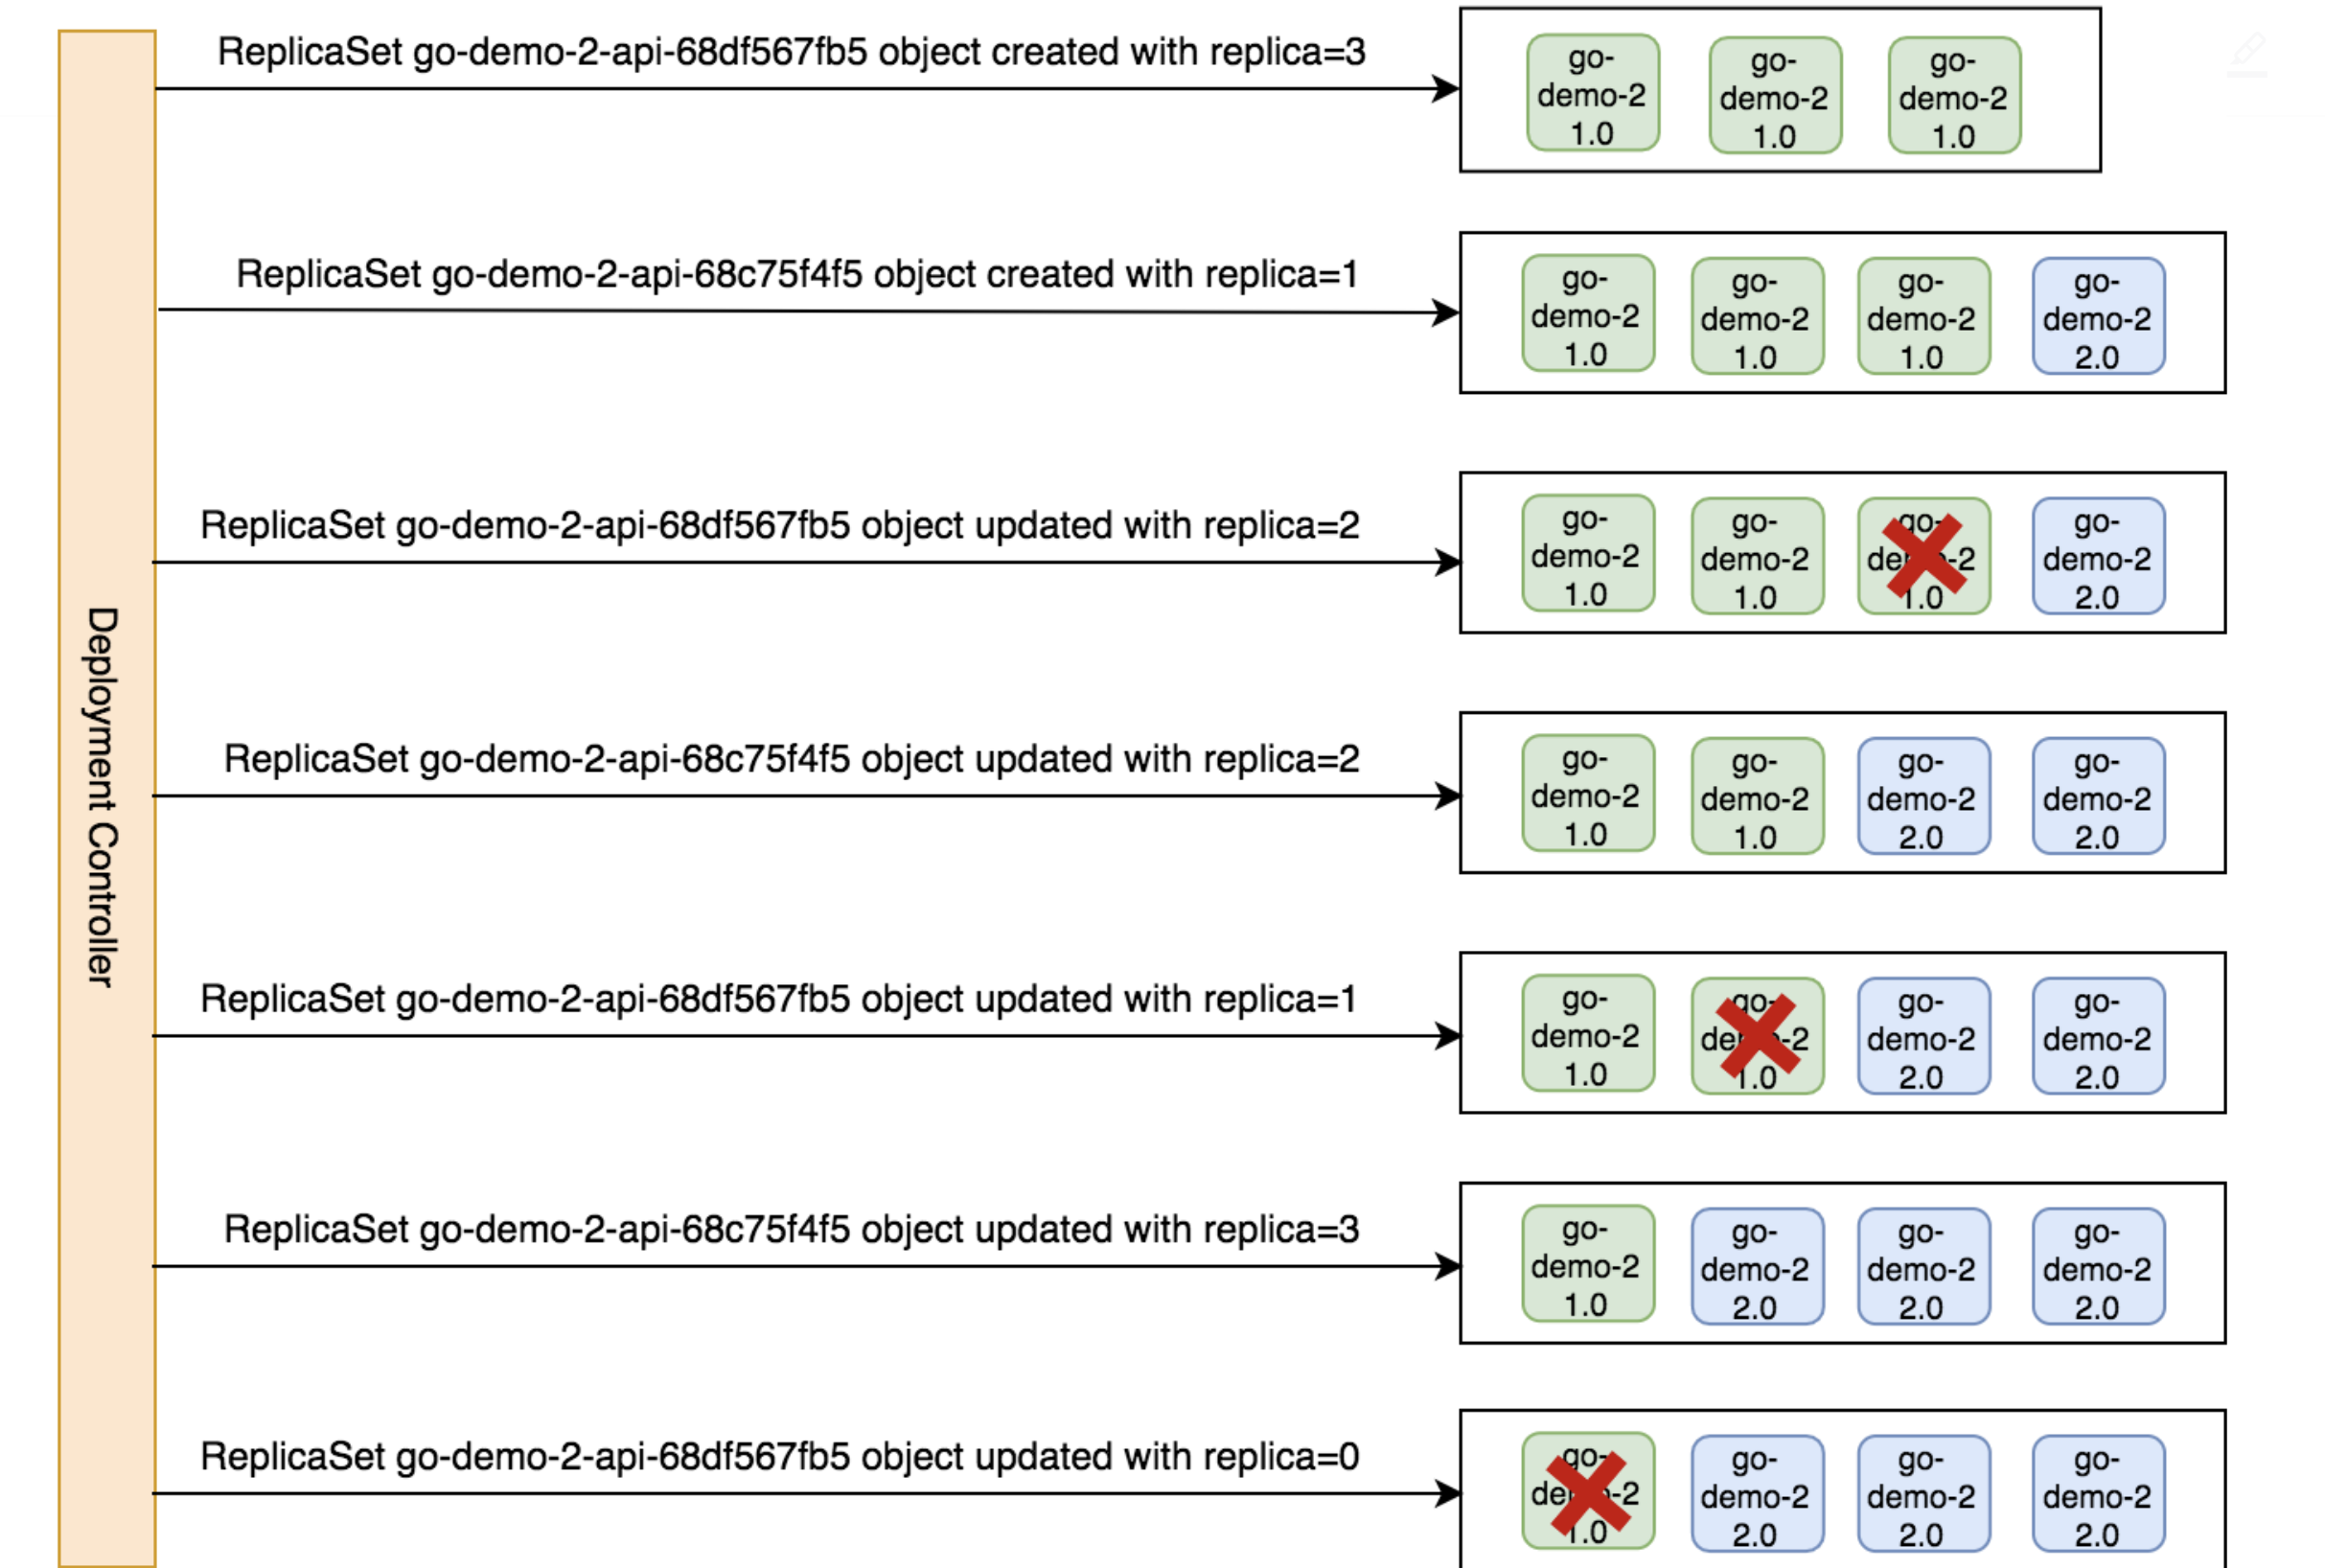
部署策略
- Recreate: 在更新前终止所有现有的 Pod
- RollingUpdate:
maxSurge: int | percentage (default: 25%),maxUnavailable: int | percentage (default: 25%)
指令执行
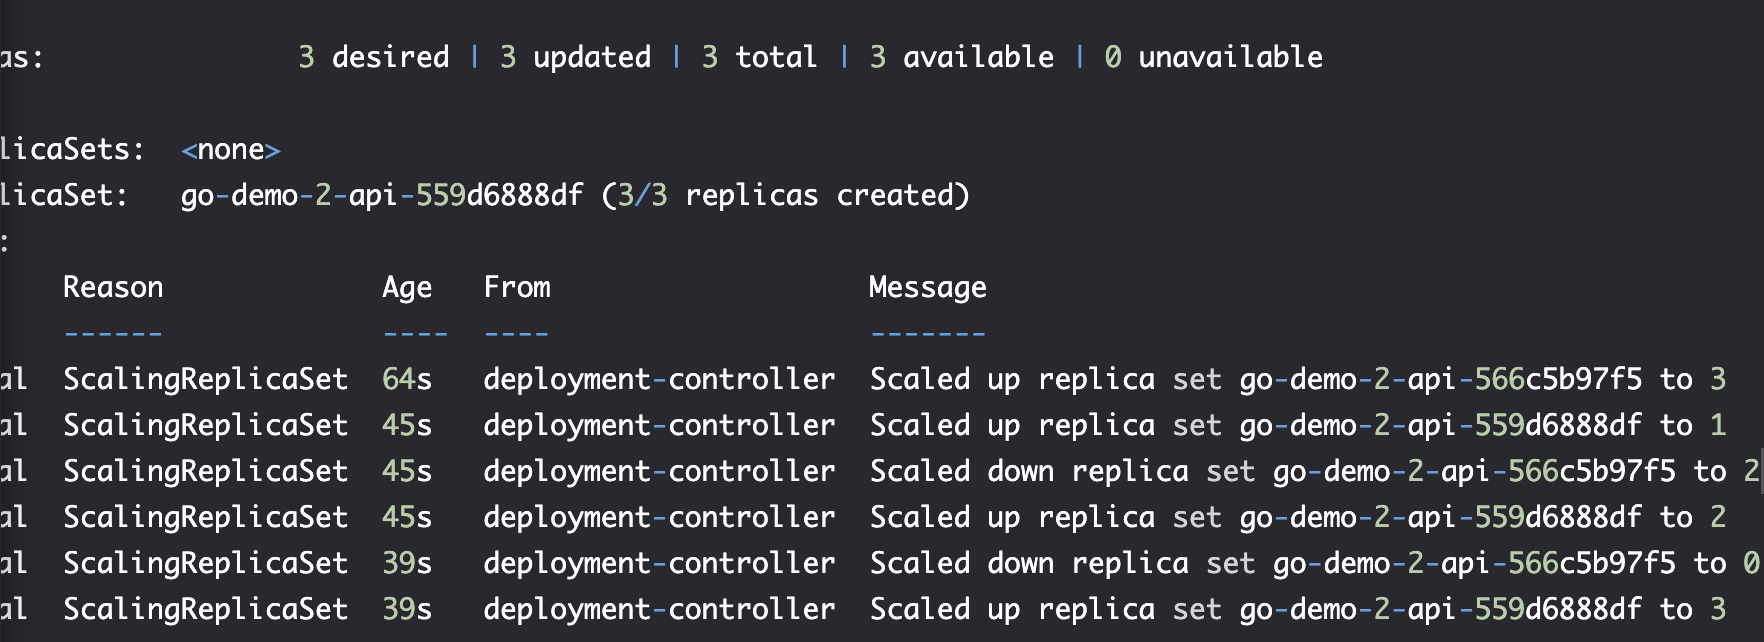
kubectl set image -f go-demo-2-api.yml api=vfarcic/go-demo-2:2.0 --record
观察 rollout 变化
kubectl rollout status -w -f go-demo-2-api.yml

kubectl describe -f go-demo-2-api.yml
查看 推送 历史
kubectl rollout history -f go-demo-2-api.yml

问题-回滚还是前滚 ? Rolling Back or Rolling Forward ?
| 特性 | ** Rolling Back(回滚)** | Rolling Forward(前滚) |
|---|---|---|
| 方向 | 逆向(Undo) | 正向(Redo) |
| 目标 | 恢复到之前的状态 | 推进到最新的正确状态 |
| 适用场景 | 事务失败、更新出错 | 崩溃恢复、增量更新 |
| 依赖 | 需要备份/快照 | 需要日志(如 redo log) |
| 示例 | 数据库 ROLLBACK | 数据库崩溃恢复(重做日志) |
如何选择
如果部署有问题,在回滚和向前滚的选择取决于更改的大小和 Deployment 部署频率。
- Rolling Back
- 适用于人为错误(如误删数据)。
- 需要快速恢复到稳定状态(如软件回退)。
- Rolling Forward
- 适用于系统崩溃后自动恢复。
- 需要最小化数据丢失(如金融交易系统)。
总结
- Rolling Back = "撤销错误,回到过去"。
- Rolling Forward = "继续前进,完成未竟之事"。 两者互补,共同保障系统的可靠性和数据一致性。
使用 Kubernetes 回滚
kubectl rollout undo -f go-demo-2-api.yml

kubectl describe -f go-demo-2-api.yml
获取推送历史
kubectl rollout history -f go-demo-2-api.yml

实践-合并所有文件
apiVersion: apps/v1
kind: Deployment
metadata:
  name: go-demo-2-db
  labels:
    type: db
    service: go-demo-2
    vendor: MongoLabs
spec:
  selector:
    matchLabels:
      type: db
      service: go-demo-2
  strategy:
    type: Recreate
  template:
    metadata:
      labels:
        type: db
        service: go-demo-2
        vendor: MongoLabs
    spec:
      containers:
        - name: db
          image: mongo:3.3

---
apiVersion: v1
kind: Service
metadata:
  name: go-demo-2-db
spec:
  ports:
    - port: 27017
  selector:
    type: db
    service: go-demo-2

---
apiVersion: apps/v1beta2
kind: Deployment
metadata:
  name: go-demo-2-api
  labels:
    type: api
    service: go-demo-2
    language: go
spec:
  replicas: 3
  selector:
    matchLabels:
      type: api
      service: go-demo-2
  template:
    metadata:
      labels:
        type: api
        service: go-demo-2
        language: go
    spec:
      containers:
        - name: api
          image: vfarcic/go-demo-2
          env:
            - name: DB
              value: go-demo-2-db
          readinessProbe:
            httpGet:
              path: /demo/hello
              port: 8080
            periodSeconds: 1
          livenessProbe:
            httpGet:
              path: /demo/hello
              port: 8080

---
apiVersion: v1
kind: Service
metadata:
  name: go-demo-2-api
spec:
  type: NodePort
  ports:
    - port: 8080
  selector:
    type: api
    service: go-demo-2