Electron
Electron
RobotJS
指南
- 官网: https://robotjs.io/
- 中文指导: https://blog.51cto.com/u_15303890/3184823
- 官网 API doc: https://robotjs.io/docs/syntax
使用案例
Issues
- https://github.com/octalmage/robotjs/issues/675
- https://github.com/octalmage/robotjs/wiki/Electron
- https://github.com/octalmage/robotjs/issues/466#issuecomment-600197990
安装
npm install robotjs
yarn add robotjs
确定版本
在 terminal 中输入了解 electron 版本信息:
npx electron -v
在 main.ts 中输入了解 node 版本信息:
console.log("process.versions.node", process.versions.node);
原生部分构建
确保在构建之前安装了必需的依赖项:
- Windows
- Visual Studio 2013 (Express works fine).
- Python (v2.7.3 recommended, v3.x.x is not supported).
- Mac
- Xcode Command Line Tools.
- Linux
- Python (v2.7 recommended, v3.x.x is not supported).
- make.
- A C/C++ compiler like GCC.
- libxtst-dev and libpng++-dev (sudo apt-get install libxtst-dev libpng++-dev).
# 安装 node-gyp 工具
# node-gyp 是一个用于在 Node.js 模块中编译原生插件的工具。
npm install -g node-gyp
# 构建原生模块
node-gyp build
node
测试和配置
npm install --global node-gyp
cd release/app
yarn add --dev electron-rebuild
yarn add robotjs
yarn add node-abi // if needed, the version link electron and node
环境配置 ENV(新)
- MacOS: [email protected], [email protected]
- Windows: [email protected], [email protected]
# Python version switch on MacOS
python3 --version
brew unlink [email protected]
brew link [email protected]
MacOS
- [email protected]
- Xcode Command Line Tools
Windows
指南
- https://github.com/nodejs/node-gyp#on-windows
- https://github.com/Microsoft/nodejs-guidelines/blob/master/windows-environment.md#compiling-native-addon-modules
[email protected] (旧)
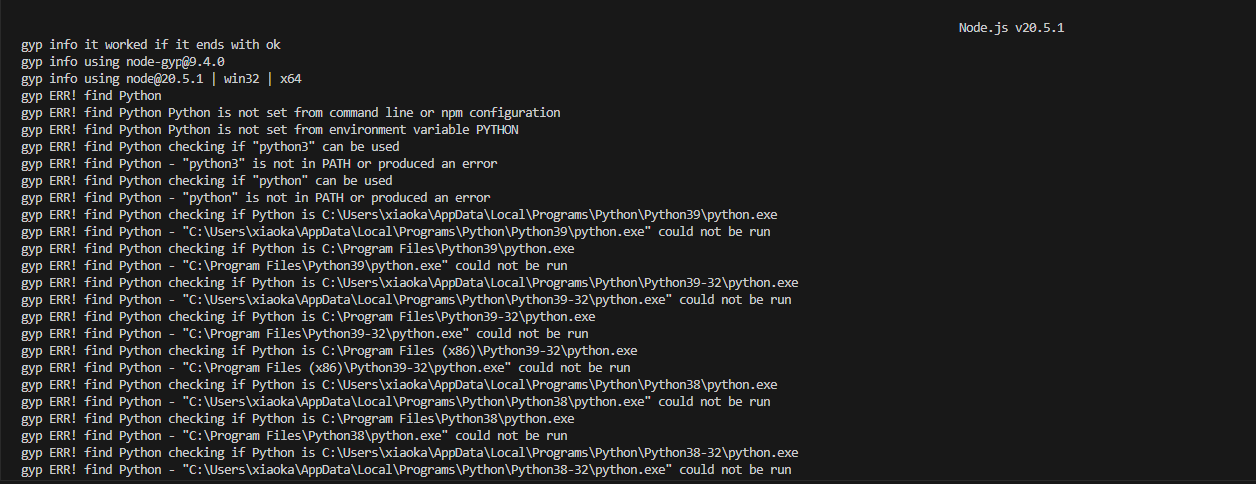
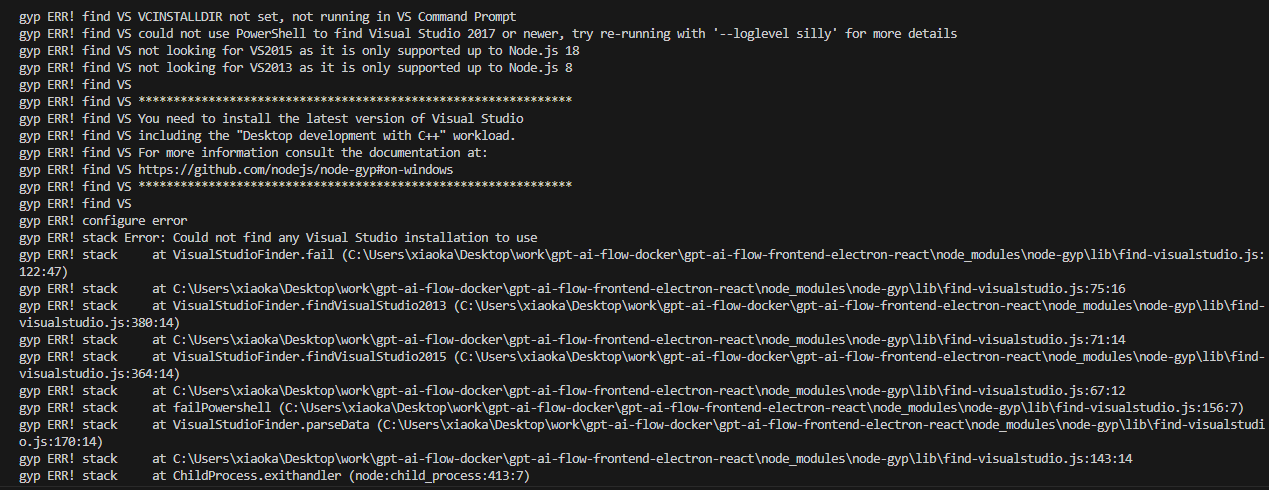
兩个问题
- 缺少 python: 去官网下载: https://www.python.org/downloads/

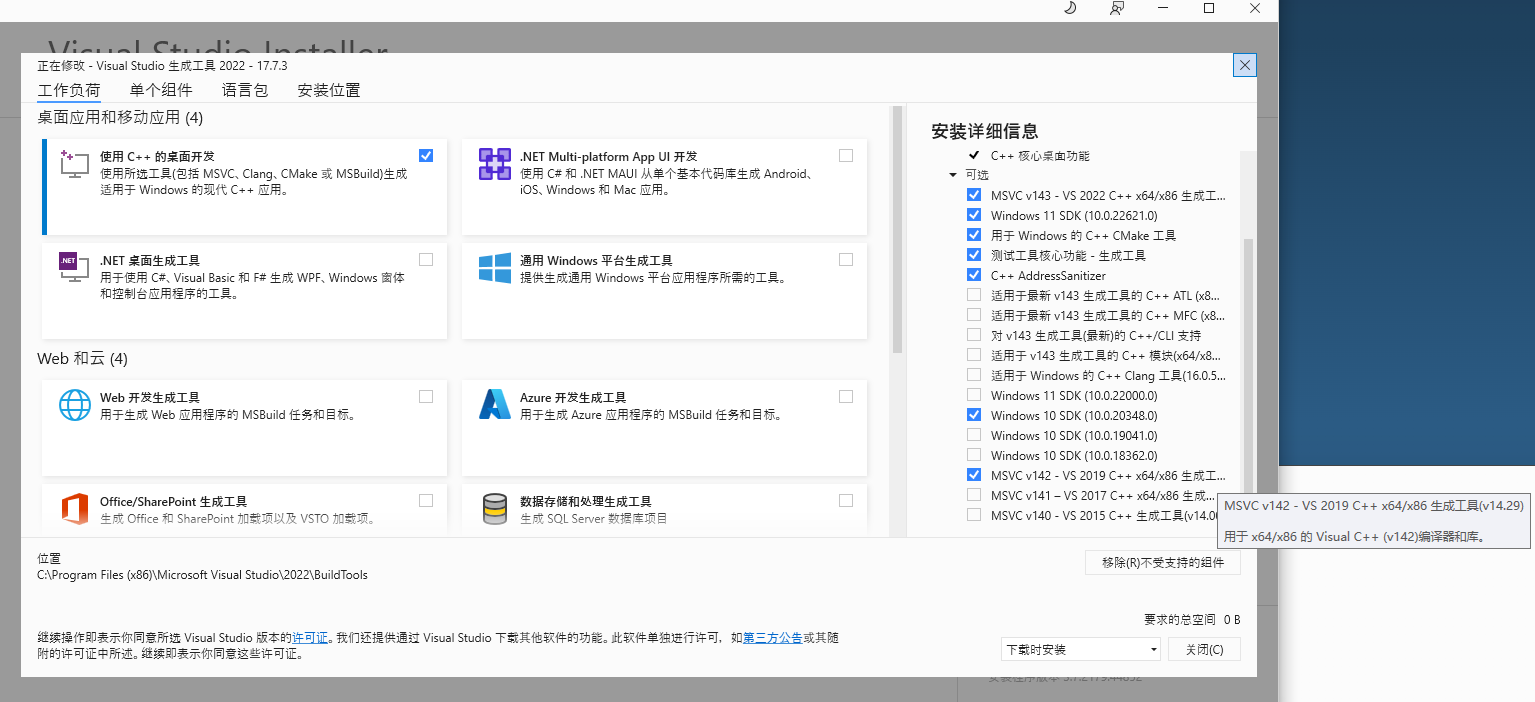
- 缺少 Visual Studio 2017 or newer: https://visualstudio.microsoft.com/fr/thank-you-downloading-visual-studio/?sku=BuildTools

我用的版本是 [email protected], VS 2019 C++ 编译器。

[email protected] (放弃)

make-fetch-happen 与 node 不兼容
[email protected] (放弃)
(install all necessary packages by node msi installation)
# Problem: can't find python
npm config set python "C:\Path\To\python.exe"
误区和坑
新版本 node 已经集成 windows-build-tools
网络上可以找到的解决方案,大多是围绕从前版本给出的解决方案,值得注意的是,新版本的 node (我的是 v20.5.1) 已经集成了 windows-build-tools。
# npm windows-build-tools: https://www.npmjs.com/package/windows-build-tools
Node.js now includes build tools for Windows. You probably no longer need this tool. See https://github.com/felixrieseberg/windows-build-tools for details.
安装 ndoe-gyp
记住一定要安装 node-gyp, 如果你忘记安装, 程序依然可以正常构建, 只不过原生依赖 robotjs 会毫无作用。
关掉防火墙
Windows 原生的安全设置需要关闭,因为 robotjs 需要一些更高级的功能,这会让 windows 认为是木马病毒。
在 设置 > 更新与安全 > Windows 安全中心 > 病毒和威胁防护 > 管理设置 > 关闭 实时保护中关闭实时安全保护。
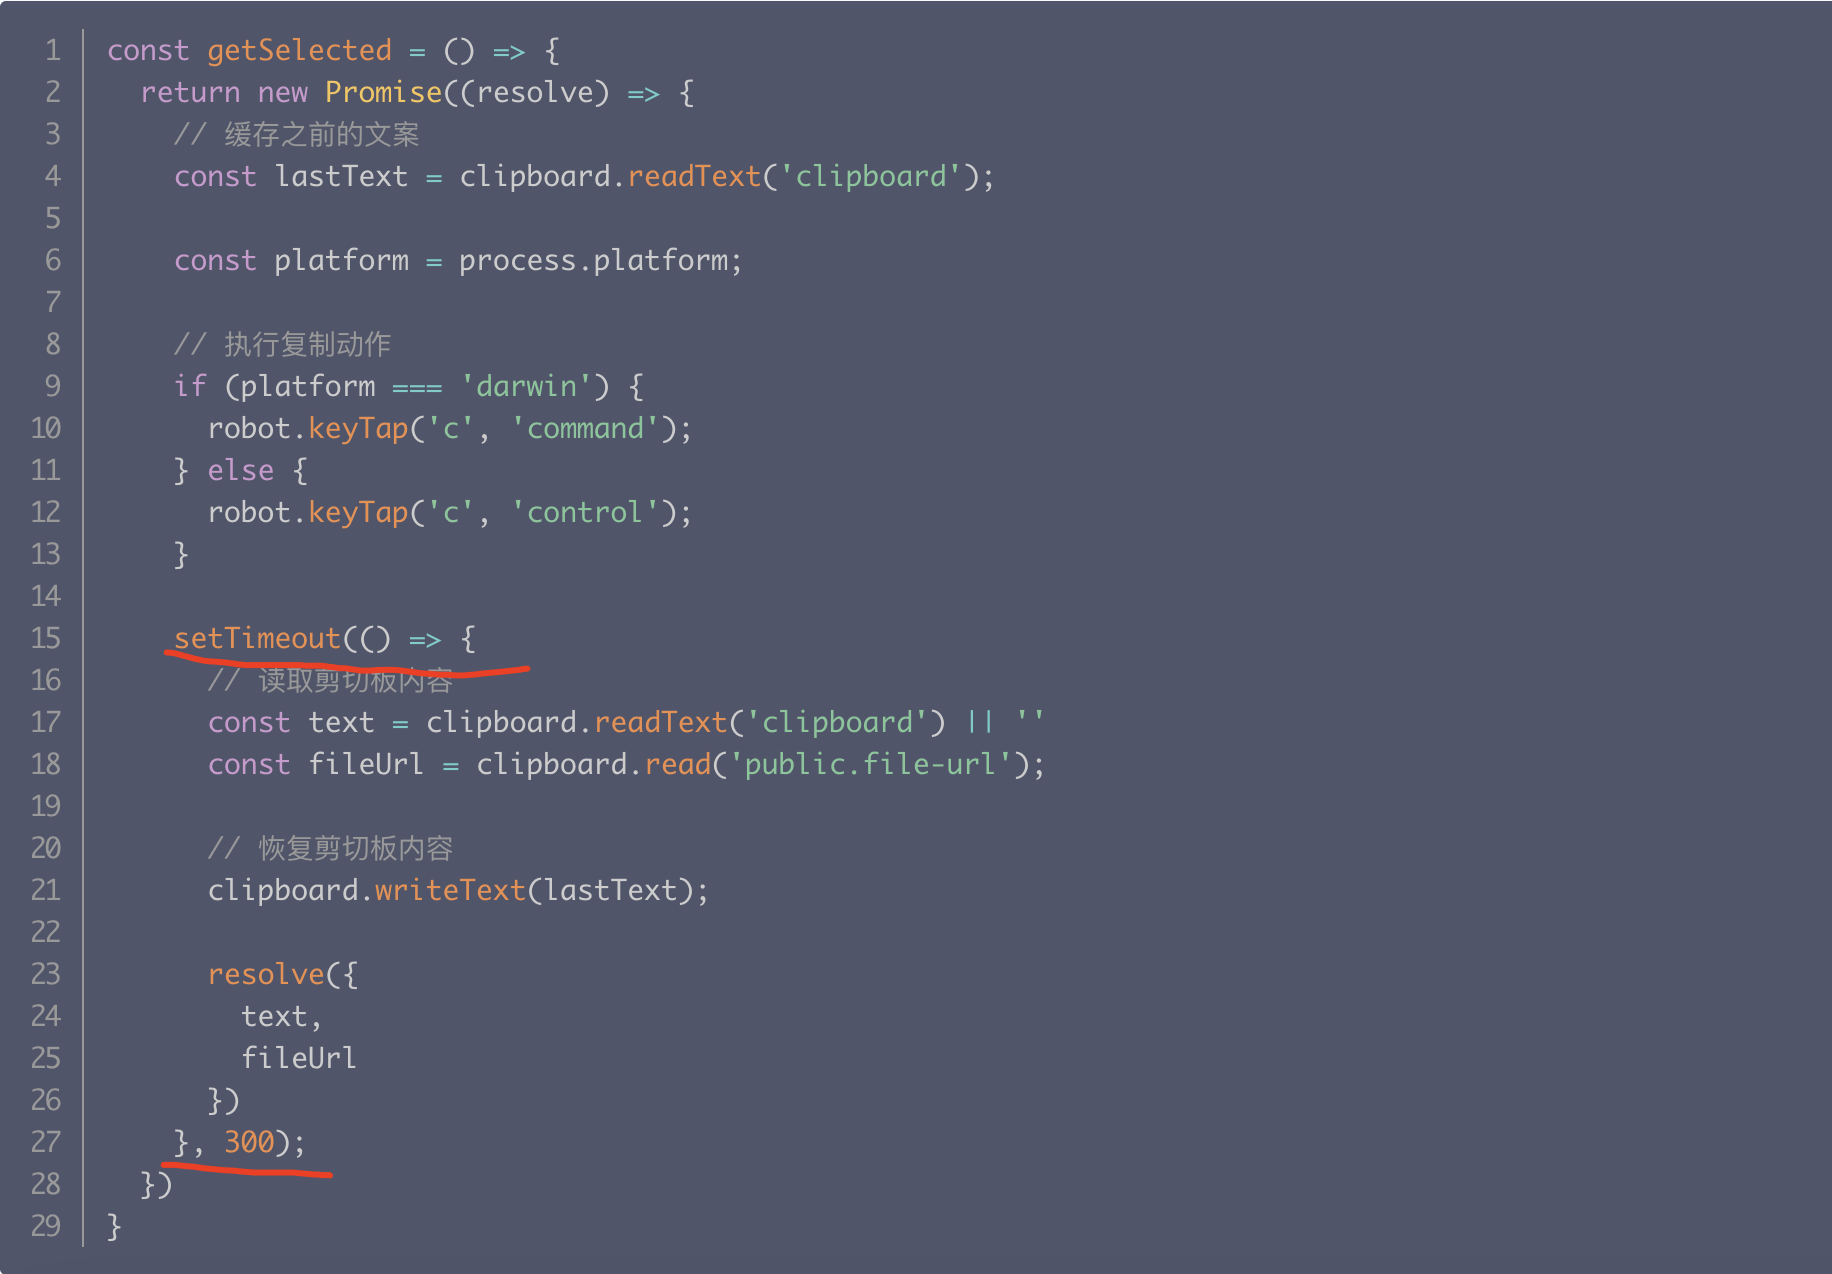
源码可能有问题
从网上拿到一份代码直接用,后来发现有问题

from: https://cloud.tencent.com/developer/article/1843530
修正之后

from: https://github.com/aabuhijleh/electron-selected-text/tree/master
即使两份代码是一模一样的功能,由于写法不一样,在不同系统会有不同的效果。
- 原代码在 MacOS 上可以运行,在 Windows 上无法运行
- 新代码在 MacOS 和 Windows 上都可运行
保证应用权限
应用权限问题,如果你无法保证用户权限满不满足,在 Windows 上可以在应用上右键选择以管理员身份运行。
不同电脑的按键按法也有区别
在 MacOS 上用户体验很丝滑,但是 Windows 上对用户的按键按法有要求,太慢功能会无效。
按什么按键需要设计好。
其他参考资料
- 选中文字效果后效果: https://cloud.tencent.com/developer/article/1843530
- https://www.u.tools/
- https://github.com/aabuhijleh/electron-selected-text
- https://github.com/octalmage/robotjs
Eslectron 如何检测用户在任意地方选取了某段文字内容?
使用系统原生模块 (Native Node Modules)。
创建 Windows UI Automation API 和 macOS Accessibility API 的例子涉及到原生操作系统编程,这通常意味着你需要在 C#(对于 Windows)和 Objective-C 或 Swift(对于 macOS)中编写代码。这些示例将演示如何捕获和响应文本选择事件。请注意,这些示例是基础的,并且可能需要更多的设置和配置才能在特定应用中运行。
原生脚本文件
Windows
在 Windows 中,可以使用 UI Automation API 来监控文本选择更改。以下是一个简单的 C#控制台应用程序示例,它设置了一个 UI 自动化事件处理程序来监听文本选择变化事件:
using System;
using System.Windows.Automation;

class Program
{
    static void Main(string[] args)
    {
        Automation.AddAutomationEventHandler(
            TextPattern.TextSelectionChangedEvent,
            AutomationElement.RootElement,
            TreeScope.Subtree,
            (sender, e) =>
            {
                var element = sender as AutomationElement;
                if (element != null)
                {
                    Console.WriteLine("Text selected in: " + element.Current.Name);
                }
            });

        Console.WriteLine("Listening for text selection changes. Press Enter to exit.");
        Console.ReadLine();
    }
}
MacOS
在 macOS 上,可以使用 Accessibility API 来监听系统范围内的 UI 事件,例如文本选择。以下是一个使用 Swift 编写的简单示例,演示如何创建一个监控文本选择的应用程序:
import Cocoa
import Quartz

class AppDelegate: NSObject, NSApplicationDelegate {
    var observer: Any?

    func applicationDidFinishLaunching(_ notification: Notification) {
        observer = NSEvent.addGlobalMonitorForEvents(matching: .leftMouseUp) { [weak self] event in
            self?.handleTextSelection()
        }
    }

    func handleTextSelection() {
        let options = NSDictionary(object: kAXFocusedUIElementChangedNotification as NSString,
                                   forKey: kAXObserverNotificationType as NSString) as CFDictionary
        var observer: AXObserver?
        let application = AXUIElementCreateApplication(ProcessID())
        if AXObserverCreate(ProcessID(), textSelectionCallback, &observer) == .success {
            AXObserverAddNotification(observer, application, kAXSelectedTextChangedNotification as CFString, nil)
            CFRunLoopAddSource(CFRunLoopGetCurrent(), AXObserverGetRunLoopSource(observer), .defaultMode)
        }
    }
}

func textSelectionCallback(observer: AXObserver, element: AXUIElement, notification: CFString, refcon: UnsafeMutableRawPointer?) {
    print("Text was selected")
}

let app = NSApplication.shared
let delegate = AppDelegate()
app.delegate = delegate
app.run()
调用方式
要在 Electron 中使用你提供的两个源代码片段(一个用于 Windows 的 C# 代码和一个用于 macOS 的 Swift 代码),你需要将它们编译成可以从 Electron 应用中调用的格式。Electron 本身不能直接执行 C# 或 Swift 代码,因此你需要创建一个中间层来桥接 Electron(基于 JavaScript/Node.js)和你的本地代码。
对于 Windows,你可以考虑将 C# 代码编译为 DLL,然后使用 Node.js 的 ffi (Foreign Function Interface)库调用这个 DLL。对于 macOS,你可以将 Swift 代码编译为动态库,然后使用类似的方法在 Electron 中调用
步骤 1:编译本地代码
-
Windows (C#):
- 使用 C# 编写你的逻辑,并编译为 DLL。
- 确保你的 DLL 导出了可以从外部调用的函数。
-
macOS (Swift):
- 将 Swift 代码编译为动态库(.dylib)。
- 使用 @_cdecl 注解来导出函数,以便可以从 C 或 Node.js 中调用。
swiftc -emit-library -o libexample.dylib example.swift
步骤 2:使用 Node.js 调用本地函数
安装 ffi-napi 包来调用你的本地库。这个包允许你在 Node.js 代码中调用其他语言编写的函数。
npm install ffi-napi
步骤 3:在 Electron 中集成
在 Electron 的主进程(通常是 main.js 或 main.ts)中,使用 ffi-napi 来加载并调用你的本地代码。
示例 (假设 Windows DLL 和 macOS dylib 已准备好):
const ffi = require("ffi-napi");
const os = require("os");

let nativeLib;

if (os.platform() === "win32") {
  // 加载 Windows DLL
  nativeLib = ffi.Library("path_to_your_dll", {
    YourExportedFunction: ["void", []],
  });
} else if (os.platform() === "darwin") {
  // 加载 macOS dylib
  nativeLib = ffi.Library("path_to_your_dylib", {
    YourExportedFunction: ["void", []],
  });
}

// 使用这个库
nativeLib.YourExportedFunction();
ffi-napi
环境配置 Env
- MacOS: [email protected](ok) | [email protected](后来又可行), [email protected]
- Windows: [email protected] | [email protected](后来又可行), [email protected]
- [email protected]
问题
缺少 distutils 模块
# Python3.11 版本能够正常运行,
# 对于 Python3.12 版本 distutils 模块已经被删除
python3 -m pip isntall setuptools
如何将 Electron 应用程序发布到 MacAppStore?
https://www.volcengine.com/theme/5623653-R-7-1
How to Integrate Tailwind CSS in Electron ?
- electron-react-boilerplate/electron-react-boilerplate: https://github.com/electron-react-boilerplate/electron-react-boilerplate
- Integrate Tailwind CSS in Electron: https://blog.saeloun.com/2023/02/24/integrate-tailwind-css-with-electron/
历史
- 2023.09.01: 增加其他参考资料
- 2023.08.27: first version
- 2023.08.28: 更新
- 2023.08.31: 总结各种坑
- 2024.04.15: 增加 ffi-napi
- 2024.04.28: 增加 How to Integrate Tailwind CSS in Electron ?
